|
|
Post by Michel on Nov 11, 2010 7:00:16 GMT -8
John,
Good work and very sharp setup with the Mistral 2 hoser and gray hoses!
I have a feeling my green Broxton with green hoses would look outstanding along with the green tanks although not quite authentic for 'para-divers' of that era as you mention. Chuck would have insisted of course!
N.B. In Canada it is 'Remembrance Day' and as in your country we remember and salute and honor our armed forces and if I may add:
'Perdition to all our enemies".
Michel.
|
|
|
|
Post by Captain on Nov 12, 2010 7:37:05 GMT -8
Glad you got them, I had seen them on ebay. I have some NOS parts for that manifold if you need anything.
|
|
|
|
Post by SeaRat on Nov 12, 2010 18:30:16 GMT -8
Captain,
Thanks for the offer, but I think the manifold will do just fine now. I have already switched out one stem from another USD valve I have, but am not using. I'll see whether it holds air in a few days, after I have finished the painting.
John
|
|
|
|
Post by nikeajax on Nov 15, 2010 19:36:49 GMT -8
John, I was thinking about you when I got out of the pool tonight after water exercise: what were the requirements for being a PJ? Like how long did you have to tread water, how far did they make you swim, and what was a punishment, if your instructor thought you did something stupid?
Jaybird
|
|
|
|
Post by SeaRat on Nov 17, 2010 18:52:35 GMT -8
Well, the tanks are painted--deep green, and are back together. The first breaths off the ol' tanks were with a Green Label BroXton. I have a major leak in the J-valve area, but I think I simply need to tighten things for that. I'll have some photos later.
Jaybird, I'll answer you later with some of my letters home.
PS--The swim test was a 3000 yard non-stop swim; Henry was our dog.
|
|
|
|
Post by SeaRat on Nov 17, 2010 21:05:13 GMT -8
The major leak on the J-valve is fixed; it was indeed simply a matter of tightening the nut. I have it filled, originally to 750 psig. After about an hour, it's at 700 psig. I seem to have another small leak on the overpressure relief valve. That may not be fixed here, as it may be a matter of the wrong type of nut in the threaded hole (too short--the LDS warned me about that). But so far, so good. It looks like it will be together and functioning for a test dive in the pool this weekend. What's really interesting from a design standpoint, especially in this day and age, as that the only O-ring is for the regulator. There are no other O-rings in this manifold.
John
|
|
|
|
Post by SeaRat on Nov 21, 2010 15:12:20 GMT -8
More adventure with this set of PJ tanks. I had them together, and yesterday went to the LDS to pick them up. They had replaced the overpressure plugs in the manifold, and when I went over, Randy said that he had gotten the pressure up to around 900 psig when he detected a leak on the right cylinder where the valve mated to the tank in the 1/2 inch tapered thread. I asked the owner, and she said that I could use the clamp in the shop to tighten that cylinder down. I went home, got my tools, and came back. I broke the set apart again, removed that side of the manifold, and tightened it further (another 1/3 turn) after again coating the threads with Teflon tape. I reassembled the set, then we tested it out by slowly filling it. We passed the 900 psig mark with no leaks, and finally achieved a full 2100 psig fill with no leaks. I took them home full, and ready for today.
This morning after church, I went to the pool for over an hour, and put the tanks into the water for the first time. My intent was to use my original Calypso regulator (which has a pressure gauge, second regulator and LP inflator on it, with the primary on a long, 6 foot hose). But it took me a long time to remove the tank for its check. The reason--I had left two half-twists in the loop on the chest strap for the quick release (the nylon harness has not been used since the 1970s on that side). Trying to pull the quick release, I found it knotted and could not get it off. I finally did get it off ('took about five minutes), and started the inspection--no leaks, not even a pinhole noted, and I was using the SeawiscopeEY to see tiny things.
I dove the rest of the time on double hose regulators, first a Healthways Scuba Deluxe Gold Label, then a Mistral, and finally my highly-modified Trieste II (best of the bunch, but the others were just fine too). It was a good dive, and I found these tanks a bit more buoyant than I had remembered. When full, they were just negative with the cylinders lifting off the bottom, or off my back. I don't think they ever became totally buoyant, but the crotch strap was necessary and I modified it in the water to hold the tanks down better.
I dove with just the scuba, fins, my Dacor tri-window mask, and my swim trunks. I was completely neutral in the water, and swimming was very, very pleasant and easy. I had my forward unit with me, and practiced my modified dolphin kick with the unit too, again with complete ease. The unit is nicely balanced, and I have the J-valve located over my right shoulder, pointed towards me rather than in the traditional location (left shoulder, pointed away, where it can be banged down without my knowing it). The only time I was as well-balanced was with a single 72 cylinder and regulator.
The tanks are now operational--Wow, after over 30 years of neglect they are ready for diving in open water--pictures to follow.
John
|
|
|
|
Post by Michel on Nov 22, 2010 8:07:17 GMT -8
John,
It must be 'buy tanks month' or something because I have just bought two galvanized 72's with original valves and harnesses from the early 70's (USD) for $100 which I will hydro shortly and put together with a modern USD twin solid bar (j) valve and military harness to reproduce the rig I used to dive in the 60' and 70's mated of course with any one of my fully functional 2 hosers.
I will post some pics of the tanks pre-restoration shortly for all to see,
don't know if I will paint just yet....more to come...
Michel.
|
|
|
|
Post by SeaRat on Nov 27, 2010 18:30:15 GMT -8
Michael, Good luck with your twin 72s. If they are galvanized, I would not paint them. My PJ tanks have no protective coating (galvanized or not), and so needed both a coat of primer and exterior paint with a corrosion inhibitor. _________________ Earlier, I suggested that the valve parts were out-of-order, and no one took me up on which was out. Well, here's a hint. I have this photo in the correct order.  Now, here are a few photos of the process of painting and assembling the tanks.  Here, the painting is occurring in my garage. I spent a number of days, and had to let it dry a complete day before handling it. Even then, I had an instance of the paint not being completely set when I had it on the newspaper, and some paper adhering to the tank. I had to be very careful to open the garage and keep the vapors released into outside air as much as possible, as I have gas heat and it could have been bad if I had gotten to the lower explosive limit (LEL) of the solvent.  I elected to keep the bands the way I received them; that way I would continue to be able to see the name on the bands.  Here was the initial filling of the tanks--note the BroXton on the cross-over manifold. I used the BroXton for the first breaths from this rig since the mid-1970s. 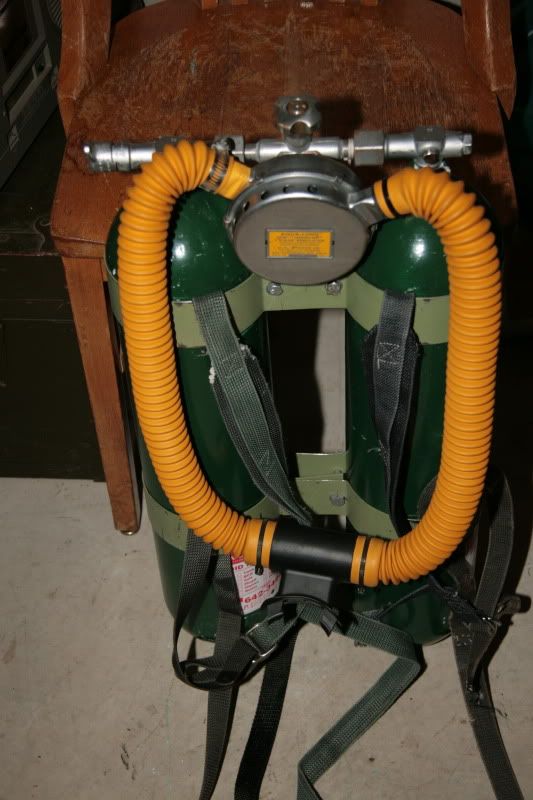 Here is what the tanks look like now, after their first dive. I put my Mistral on them, as the green and yellow go well together (Go Ducks! in all games but the Civil War). 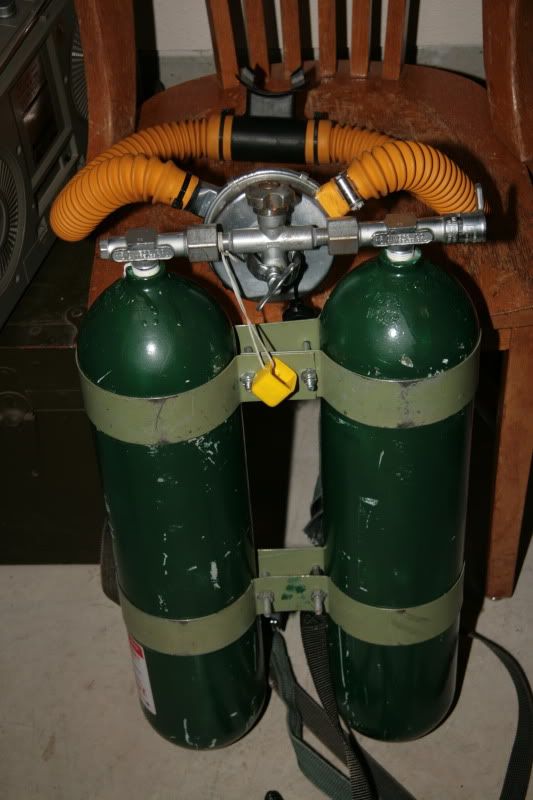 Here's what they look like from the back. The tanks got a bit nicked up in the assembly process, as I had to do it twice to get it completed. I may put more paint on it to spiff it up a bit. But at least the tanks are now protected from further corrosion, and that is the reason of the painting anyway. These tanks feel really good in the water. They hug my back, with the bottoms lifting slightly because of their buoyancy. I had to adjust the crotch strap to hold the tanks down. This will change as I get the harness for my Para-Sea BC, and it's four-point attachment to the hip connectors. I am going to order a yellow harness from Alan (Simonbeans), specially made for this set of tanks. John |
|
|
|
Post by kgehring on Nov 27, 2010 20:02:06 GMT -8
Those look G R E A T!!!!!!!!
|
|
|
|
Post by Michel on Nov 28, 2010 8:46:55 GMT -8
John,
Great job! Unit looks very 'military' and cooool....
Thanks for the suggestion about not painting my 72's, I think a good clean up will render them a nice silver galvanized look without the trouble of painting and twin s.s. steel bands with black harness will produce the desired look of a 'no nonsense' rig.
By the way, I intend to overhaul the 2 j valves that came with my grab bag purchase but am unfamiliar with the process, it seems that these valves like your twin set up have no o-rings, do you know the procedure for removal and most of all the applicable torque values to use on the various bolts, caps etc.. for re-assembly? I have the schematics but no procedural check list. Any help, advice would be most appreciated, photos of tanks will be posted shortly...
Thanks,
Michel.
|
|
|
|
Post by Michel on Nov 28, 2010 11:36:21 GMT -8
John,
A few shots of tanks before restoration and a j valve breakdown
in my 'lab' amongst other on going vintage scuba projects and of
course the USD solid twin tank valve destined for the 72's...
The 'green' Broxton is there in Chucks memory of course!
Michel.
|
|
|
|
Post by Michel on Nov 28, 2010 11:37:36 GMT -8
And another...
|
|
|
|
Post by Michel on Nov 28, 2010 11:38:27 GMT -8
Again
|
|
|
|
Post by Michel on Nov 28, 2010 11:39:45 GMT -8
Last but not least...
|
|


