|
|
Post by vance on Jan 15, 2018 14:37:16 GMT -8
John is correct: the valve body in the plastic can just unscrews into 2 parts.
However, care must be taken not to damage the plastic when wrenching on a corroded tight nut. I had to clamp the outside nut in the vise and carefully but forcefully turning the inner part while guiding the plastic can around with it.
The c-clip holds the body o-ring tight against the plastic flange to stop water incursion. It's a very simple valve assembly. 1 o-ring, a spring, the seat, and the two valve halves make up the internals, and the c-clip, a lever, bushing and nut, and an external o-ring make up the rest.
|
|
|
|
Post by nikeajax on Jan 15, 2018 17:53:53 GMT -8
Phil, thanks for keeping us posted on the progress of your projects!  From what I've seen, your 300 is from the early '70's. How big is the exhaust mushroom on the Sport Diver? JB |
|
|
|
Post by SeaRat on Jan 15, 2018 18:14:13 GMT -8
John is correct: the valve body in the plastic can just unscrews into 2 parts. However, care must be taken not to damage the plastic when wrenching on a corroded tight nut. I had to clamp the outside nut in the vise and carefully but forcefully turning the inner part while guiding the plastic can around with it. The c-clip holds the body o-ring tight against the plastic flange to stop water incursion. It's a very simple valve assembly. 1 o-ring, a spring, the seat, and the two valve halves make up the internals, and the c-clip, a lever, bushing and nut, and an external o-ring make up the rest. Vance, 'Good to hear that you got it apart. I never had to clamp and rotate the inner part, rather I put a wrench on the inner part and used my Cresent wrench on the outer, and that was what turned. After you get the corrosion free, lub the O-ring, etc., when you put it back together get the inner part set in place, with the C-ring on it, then simply screw in the outer part until you engage the O-ring. Then just a slight tensioning with the two wrenches should do the trick. The plastic body should receive no tension at all, as it is just the two metal parts that need to be screwed together. Again, as the outer portion with the metal seat is screwed down, be sure to keep the demand lever down and the rubber seat on the other side away from the rotating metal seat. John |
|
|
|
Post by vance on Feb 1, 2018 15:40:13 GMT -8
I think that sounds like an excellent idea your using that SD as your octo, they are a very neat looking second stage... JB The SportDiver II is now installed on my Hydro Twin, along with the Sea-Vue pressure/capillary depth gauge. It looks pretty good. Only problem is the Tee splitter doesn't fit too well due to the placement of the ports. The Tee hits the SPG connector. I've got to find a two way splitter instead of the three way, or do some machining on my 3 way. That'd probably work best. |
|
|
|
Post by vance on Feb 1, 2018 15:41:27 GMT -8
I forgot to mention, that after getting the 300 second back together, it's a hella good breathing second. That one may go on the HTII instead...
|
|
|
|
Post by SeaRat on Feb 1, 2018 16:54:44 GMT -8
Vance, It may be a bit late, but here's some photos and schematics of my White Stage DEEP I regulator. 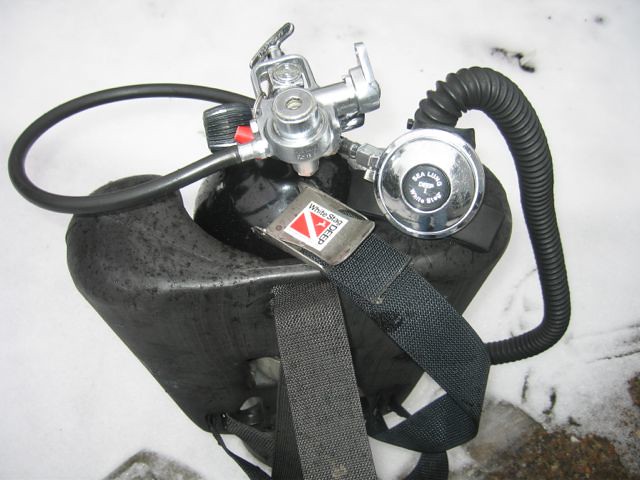 This shows the regulator on a regular Sportsways first stage. I now have the DEEP I first stage too, with two of these second stages. You can also see the White Stag DEEP hard shell BC that I have. It's not like the Dacor Nautilus CVS, as it is not a constant volume. Unlike the Dacor, there is simply a hole in the bottom on either side that allows water in, or air out. 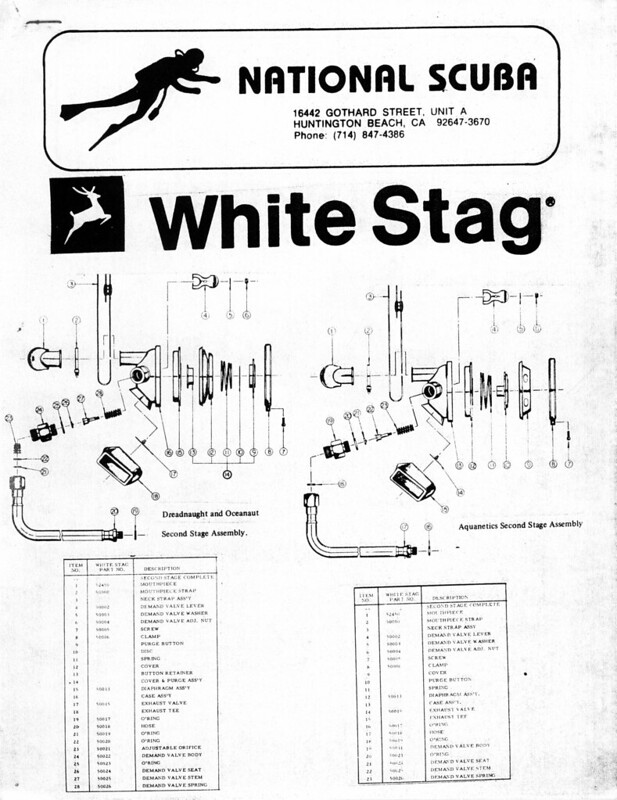 This is the schematic for the metal regulator second stages.  This is a diagram of how the plastic second stages work. 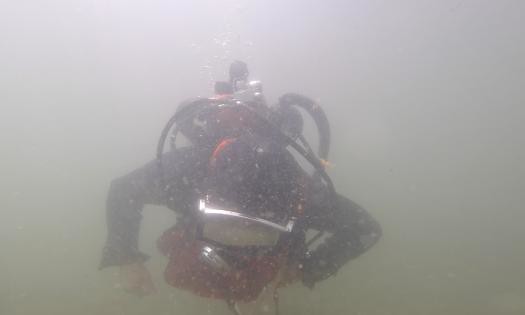 And finally, this photo is off a GoPro video (somewhere, I have it) of me diving the White Stag DEEP I regulator with the White Stag hard shell BC and a White Stag vest. John |
|
Deleted
Deleted Member
Posts: 0
|
Post by Deleted on Feb 1, 2018 17:14:57 GMT -8
Sports Ways Sport Diver II......hummmmm.........rumage rumage in closet. Yep, that was my first regulator I actually bought in 1968. Wanted a Aqua Lung but the dive shop didn't carry that line. Mine was all brass, 2nd stage had a clamp around the rim with a set screw. 3 LP ports and 1 HP on 1st stage. Heavy as all get out in the mouth, but I was young and fearless. Dove with it in Okinawa after getting tired of not getting a rental Aqua Master on the weekends (dive classes took them up), Calif, all the lakes I could get to in Texas; until I sold it when I got divorced, then a few years later, bought it back. It still functions but I just keep it now for memories. Photo of me with my gear back in 68. All Sportsways. 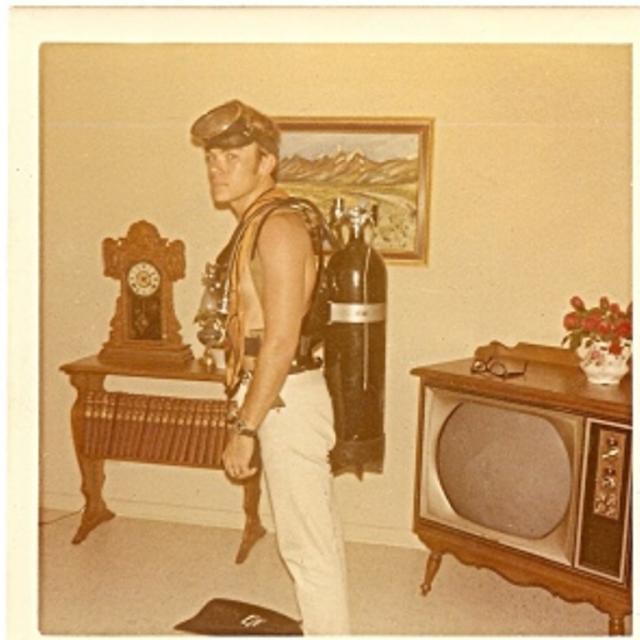 2010jan3photopackage1180 2010jan3photopackage1180 by Robert Smithe, on Flickr  Boy, was I skinny. |
|
|
|
Post by vance on Feb 1, 2018 17:16:46 GMT -8
John, you are a national treasure! Thanks for sharing all of your experiences and all of your knowledge gained over a lifetime of diving! You da man!
|
|
|
|
Post by vance on Feb 1, 2018 17:22:10 GMT -8
Sports Ways Sport Diver II......hummmmm.........rumage rumage in closet. Yep, that was my first regulator I actually bought in 1968. Wanted a Aqua Lung but the dive shop didn't carry that line. Mine was all brass, 2nd stage had a clamp around the rim with a set screw. 3 LP ports and 1 HP on 1st stage. Heavy as all get out in the mouth, but I was young and fearless. Dove with it in Okinawa after getting tired of not getting a rental Aqua Master on the weekends (dive classes took them up), Calif, all the lakes I could get to in Texas; until I sold it when I got divorced, then a few years later, bought it back. It still functions but I just keep it now for memories. Photo of me with my gear back in 68. All Sportsways. Vintage diving requires a certain amount of.....what. Shmaybe a bit of "This is not optimal, but it'll do?" You, of course, know this. We're just having fun here, right? |
|
|
|
Post by nikeajax on Feb 1, 2018 17:27:07 GMT -8
Phil, I just sent you an email, I haven't forgotten about what I told you, just haven't had time... I'll get it out to very soon...
JB
|
|


