|
|
Post by cnotthoff on Jan 23, 2018 20:16:00 GMT -8
Everything is back together with teflon tape. The tanks and manifold are currently in a water tank in the backyard with a pressure gauge attached. Tank pressure is 1800 psi with no bubbles. Huzzah! The j valve is a source of puzzlement though. On is off and off is on. I an looking for a diagram of a pre-1960, USD, 1/2 inch pipe thread manifold. More news as it happens. Yep, teflon tape is the way to go. Glad to hear you got them sealed with no bubbles. Did you get the reserve lever corrected? Good Dives, Charlie |
|
|
|
Post by vance on Jan 24, 2018 9:57:10 GMT -8
Crabby and Phil, I was thinking what if you guys put a very thin coat of RTV where the two parts of the manifold meet up? Not a lot would be needed! Also, you would want to get things only finger tight until the RTV has cured, then once cured, you could torque the connections down... You might also try polishing the connections if you'd rather not use the first method  JB I suspect either the bushings, like Crabby's, or the J valve. I need to get some air in the tanks so I can immerse them and get to the bottom of it. Spraying soapy water didn't do it, as it must be a tiny leak. Jim S says that the ball type connectors sometimes needed to be worked in with lapping compound. Once together and sealing, never take them apart! These 1/2" USD manifolds are a pain all around. There's no good place to get a wrench on the tank thread sides and someone buggered mine up pretty good with BFPW. |
|
|
|
Post by SeaRat on Jan 24, 2018 12:22:59 GMT -8
I have a set of doubles (my PJ tanks) that have a 1/2 inch manifold. I use a very large crescent wrench on these, and grab them by the main valve right over the stem (on the J-valve side, in front of the J-valve area). This has worked for me over the years, and I haven't buggered them either.
I also take them apart each time (once a year now) for their visual. So far, so good.
John
|
|
|
|
Post by duckbill on Jan 24, 2018 12:27:50 GMT -8
These 1/2" USD manifolds are a pain all around. There's no good place to get a wrench on the tank thread sides and someone buggered mine up pretty good with BFPW. Every time I hear of people having trouble with R&R of 1/2" manifolds from cylinders, I think of Captain. I haven't seen him around here in a long time. I hope he is well. Here's the old method I was using. It worked, but was not ideal.  Now, here's the nugget of wisdom Captain divulged regarding the proper tool you can make yourself. You need to make a wrench that screws onto the gas fitting end of the manifold elbow. Take the center section of the manifold to a welding supply store, and tell them you need a 3" CGA nipple and nut to match the nipples and nuts that are on the center section. Then get a 1/4" pipe connector and a 6"-8" pipe nipple from a hardware store. machine, grind, or file the dome off the CGA fitting, leaving about a 1/8" stub. Put the CGA nut on the CGA fitting, screw the coupling to the GCA fitting and the extension nipple into the coupling. Screw the assembly tightly on the manifold elbow and use it to R&R the elbow. (I used an 8" galvanized nipple on mine)   Once together and sealing, never take them apart! This works fine for 3/4" manifolds with O-rings that can be turned on and off of the manifold, but it won't work very well at all on 1/2" tapered manifolds where you need to turn the fitting out of the cylinder with a wrench. Here are a couple tips for manifold reassembly: The compression fittings have to be very tight to seal. To help get maximum turning with minimal torque, put some silicone grease on the threads to help the nut turn with minimal drag. Once each side is moderately tightened, lay the cylinders flat on the ground and stand on them to prevent twisting while you finish tightening. You have to use two large wrenches, one on each nut, to turn them in equal and opposite directions. With large enough wrenches and a little silicone grease on the threads, you don't have to be a gorilla. A little better than snug should be enough. |
|
|
|
Post by vance on Jan 24, 2018 12:36:32 GMT -8
Great suggestion, Terry! I'm gonna make one of these!
|
|
|
|
Post by crabbyjim on Jan 24, 2018 15:18:26 GMT -8
Update on the tanks, bushings and 1/2 inch valves.
Thanks to all of you the, valves don’t leak and the j valve is properly oriented. I will try to post pictures here as well as on Vintage Diving in Monterey California on Facebook. You can see them in person at the 2018 Monterey Vintage Dive gathering.
|
|
|
|
Post by nikeajax on Jan 27, 2018 10:51:51 GMT -8
Just get a weed puller and straighten it. Then, file a slot in it. 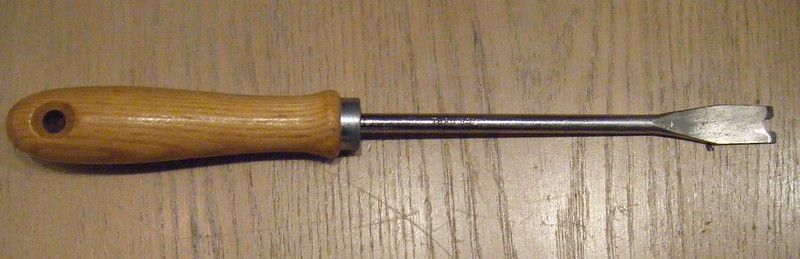 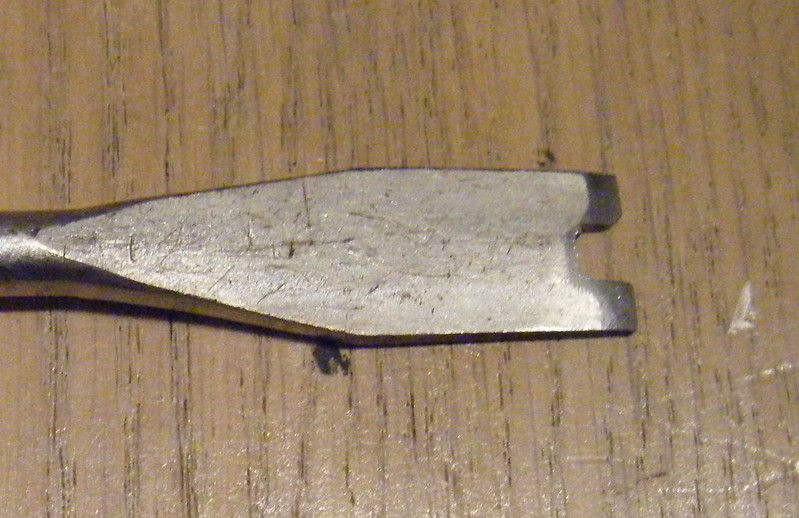 Phil, I've been doing electrical work on my new tool shed... I just made a tool that does the same thing as your tool, but mine was made from a knock-out/slug from a junction-box... Just lock your part down as usual, but mine is turned with a crescent wrench: TORQUE, and lots of it if need be!  Oh, and it's about the size of a quarter for easy storage  JB |
|
|
|
Post by vance on Jan 27, 2018 14:11:51 GMT -8
It's harder to pull weeds with yours! Good idea, though, if you only need to unscrew those slotted buttony things!
|
|
|
|
Post by vance on Jan 30, 2018 8:47:18 GMT -8
I got some air in my 38s and did the soapy spray thing at Steele's. Nothing. Maybe a bit of foaminess at the bushing, but no bubbling anywhere.
I brought them home and let them sit a couple days. Checked the pressure: 500 psig. So, I stuck them in a garbage can filled with water and there it is. The coupler is leaking away and the reserve is putting out a few bubbles too. I tightened the coupler a lot, and it still bubbles away. I'll try lapping....And some new packing for the reserve.
|
|


 Oh, and it's about the size of a quarter for easy storage


