|
|
Post by scubalawyer on Jun 23, 2020 8:48:38 GMT -8
That does look great, Mark. I hope the thin nylon will work. Here's a pic of the main diaphragm material exhaust diaphragm trimmed and installed with the new clamp. It should work, and it's tough. Well, I tried the thin nylon; however, the silicone is just too soft/flimsy to stand up to clamping with the thinner material. I like your concept of using actual diaphragm material to make, well,a diaphragm. Maybe I missed it but how did you heat the material? Mark |
|
|
|
Post by vance on Jun 23, 2020 9:07:39 GMT -8
I made a rough form out of a tomato paste can and held the material in place with a zip tie, then heated it with a heat gun. It forms the rim well enough to install it on a Scuba without moving around. Then I heated it again. After taking it off and trimming, then installing/reinstalling a few times to tighten it up it seems to shape up well enough. 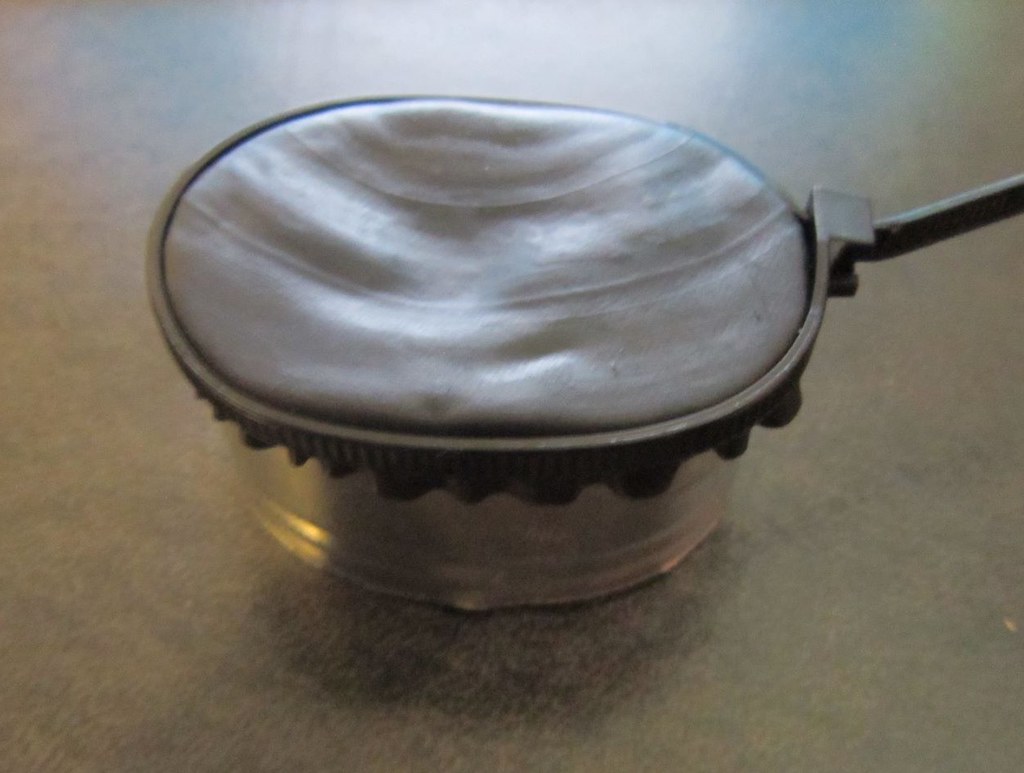 |
|
|
|
Post by Terry on Jun 23, 2020 12:17:24 GMT -8
Well I've been watching this thread with great interest and wondering how I can possibly contribute to a solution in regards to this exhaust diaphragm.  After reading all of your different ideas I began looking for that "something laying around the house solution" that could be used for some type of a form to cast a new diaphragm, and I found something that might work; 1-1/4" wooden dowel rod. The diameter of this rod seems to be a perfect fit for the inside diameter of the curved ends of this diaphragm, and they very slightly overlap in the middle. After finding this out I went out to the garage and cut two 2-1/2" lengths of this rod and after carefully fitting them on a diagram I had on paper of this diaphragm I determined that I needed to shave off about 3/16" off of both inside edges of these rods where they meet at the middle. After that I held them together and trial fitted my original diaphragm over these two rods and it fit perfectly with only minor indentations at the middle on both sides where the dowels were joined. I now have both dowels glued together and I'm thinking that after the glue has dried those minor indentations can be filled with wood filler, bondo, etc.; whatever will fill those sides to complete the shape of the form. As for the material to use on this form to cast a new diaphragm - DUH! I've never done any casting of any rubber parts so as for that part of the process I still have to figure out what to use. Anyway you guys have definitely got my interest and this is just one idea that I have come up with.  |
|
|
|
Post by nikeajax on Jun 23, 2020 12:24:43 GMT -8
...Plastic? What do you mean? Isn't it neoprene impregnated cloth? PY, yes, I agree with you: I can't help but think the two Marks have some that are very oxidized and hard. The two I have are made from the same material as the OEM-diaphragm.  JB |
|
|
|
Post by Terry on Jun 23, 2020 14:01:57 GMT -8
|
|
|
|
Post by Terry on Jun 24, 2020 13:23:21 GMT -8
I managed to get the sides filled with Bondo on the dowel rod form that I was working on yesterday, and after getting it all sanded down nice and smooth while I was trial fitting it with my original exhaust diaphragm I got an idea from one of the other posts on this thread. I remembered the picture Phil posted of the rubber material he had fitted over the tomato paste can, and the thought came to me of trying inner tube material fitted over the form I just made. So I now have a sample piece of that zip tied to my form which I'll leave there for awhile and see what turns up with that.  |
|
|
|
Post by scubalawyer on Jun 24, 2020 13:36:40 GMT -8
I do believe I done did it! 1. Laid the thicker pantyhose material over the exhaust flange. 2. Cinched a thin zip tie around where the wire clamp would normally go. 3. Painted on silicone (Shore Hardness of 40). 4. Let dry and removed the zip tie. The secret was using the zip tie to hold the fabric against the exhaust flange. My previous experiments already showed the nylon impregnated silicone was strong enough to hold up to clamping. The problem was that with the nylon in place, there was nothing to hold it against the curve of the flange when the silicone was applied so (1) it would not seal, and (2) the outer surface to be clamped was not flat. I tried an o-ring to hold the material next to the flange but that only held it in one small line around the curve. The flat zip tie solved that problem. An now, the big reveal:  |
|
|
|
Post by Terry on Jun 24, 2020 14:45:53 GMT -8
Hey Mark that's looking really good and sounds very promising. You just might have "Broke The Code"! The silicone that you mention brushing on; is it something you have to mix or is it pre-mixed; tell me more about it. Thanks for the post and picture; I think we're starting to see some light at the end of this tunnel.  Mark I got to thinking after I saw your post with the picture if using the form I made would work better than trying to do your procedure in the reg can as you've done. Using my form instead of trying to do it in the reg can would be easier to work on and also allow you to zip tie the fabric down further on the form. After the silicone has been brushed on and it cures the new diaphragm can then be removed from the form and trimmed as needed.  |
|
|
|
Post by scubalawyer on Jun 24, 2020 17:32:55 GMT -8
Hey Mark that's looking really good and sounds very promising. You just might have "Broke The Code"! The silicone that you mention brushing on; is it something you have to mix or is it pre-mixed; tell me more about it. Thanks for the post and picture; I think we're starting to see some light at the end of this tunnel. Mark I got to thinking after I saw your post with the picture if using the form I made would work better than trying to do your procedure in the reg can as you've done. Using my form instead of trying to do it in the reg can would be easier to work on and also allow you to zip tie the fabric down further on the form. After the silicone has been brushed on and it cures the new diaphragm can then be removed from the form and trimmed as needed. Hi Terry. I like where you are going with the wood dowel idea. The silicone I use is a mixture of PlatSil® Part H Hardener with Platsil Gel 25 A and B in a 1-1-1 ratio which gives a shore hardness of about 40 (and which I think is about right for this application). Keep up the 'spiramentin. Who knows what may be discovered. What I laugh at is that we are a bunch of old guys collectively working on a 60+ year old issue on a single model regulator. We are a subset of a subset of niche in the world of diving.  |
|
|
|
Post by nikeajax on Jun 24, 2020 18:31:38 GMT -8
...What I laugh at is that we are a bunch of old guys collectively working on a 60+ year old issue on a single model regulator. We are a subset of a subset of niche in the world of diving.  An' ya've got a problem with that? An' ya've got a problem with that?  JB |
|
|
|
Post by vance on Jun 24, 2020 19:08:44 GMT -8
How to make a stainless clamp: Get some stainless CV joint boot clamps. Cut them down lengthwise with a set of tin snips as necessary. 1/8" will work. Clamp the stuff lengthwise in a vise and file to consistent width. Leaving a 1/2" tail, double bend one end of the strip. I use 3/16"-ish tabs. Measure 5 7/8" to the next bend up and double bend the strip to finish. Drill 1/16" holes and file out slightly for 1/2 " 2-56 screws and nuts.  |
|
|
|
Post by SeaRat on Jun 24, 2020 22:06:49 GMT -8
I'm trying something new; a video off Flickr. I "shot" a cell phone video last night just before bedtime, when it was quiet and my wife had already gone to bed. Why? Well, I wanted to actually show you the Nitril material Healthways exhaust diaphragm that I had made. Now, this is showing one that is a single layer, without the Shoo-Goo sealant that is on my Healthways Scuba Hybrid regulator. So, here goes:  IMG_1549 IMG_1549 by John Ratliff, on Flickr I missed a few of the examples, as I wanted my cell phone horizontal, and in that configuration apparently I cannot change it from the video to the video selfie. So you missed seeing be breathing into the original exhaust diaphragm, without it sealing (although you can hear it). And, I did not put it into any program to put titles, text, etc. So this is rather raw video from last night. You'll have to click on the photo, and it will take you to Flickr, where you can click on it again and play the video. John PS, Flickr cut it off sooner than the video. It actually went on for another almost minute, but that did apparently not get uploaded to Flickr. |
|
|
|
Post by james1979 on Jun 25, 2020 7:36:48 GMT -8
ScubaLawyer invited me to throw my 3d printer at the exhaust diaphragm problem.... If somebody could give me measurements (preferably metric on the oval lip it seals to, I'll model something up and try it. Just to manage expectations, the material at hand is duro 95 urethane, so I'll do my best but think Mark's method is probably going to be a superior product! Respectfully, James
|
|
|
|
Post by scubalawyer on Jun 25, 2020 7:52:33 GMT -8
ScubaLawyer invited me to throw my 3d printer at the exhaust diaphragm problem.... If somebody could give me measurements (preferably metric on the oval lip it seals to, I'll model something up and try it. Just to manage expectations, the material at hand is duro 95 urethane, so I'll do my best but think Mark's method is probably going to be a superior product! Respectfully, James
James, Unless someone does it earlier (Phil?) I will get you the measurements tonight. If it is any help, here is a link to a thread I started over on VDH that has some info. www.vintagedoublehose.com/forum/viewtopic.php?f=2&t=9799Mark |
|
|
|
Post by Terry on Jun 25, 2020 9:15:19 GMT -8
Great video John; I found it real interesting to be able to see the difference in how the original diaphragm works as well as the nitrile modification. I like the sealing capabilities of the nitrile more than the original. Hopefully with The "Healthways Scuba Exhaust Diaphragm TASK FORCE" collectively working on this issue we'll all come up with a solution! Thanks for the video. Terry |
|


 After reading all of your different ideas I began looking for that "something laying around the house solution" that could be used for some type of a form to cast a new diaphragm, and I found something that might work; 1-1/4" wooden dowel rod. The diameter of this rod seems to be a perfect fit for the inside diameter of the curved ends of this diaphragm, and they very slightly overlap in the middle. After finding this out I went out to the garage and cut two 2-1/2" lengths of this rod and after carefully fitting them on a diagram I had on paper of this diaphragm I determined that I needed to shave off about 3/16" off of both inside edges of these rods where they meet at the middle. After that I held them together and trial fitted my original diaphragm over these two rods and it fit perfectly with only minor indentations at the middle on both sides where the dowels were joined. I now have both dowels glued together and I'm thinking that after the glue has dried those minor indentations can be filled with wood filler, bondo, etc.; whatever will fill those sides to complete the shape of the form. As for the material to use on this form to cast a new diaphragm - DUH!


