|
|
Post by SeaRat on Sept 6, 2020 18:00:58 GMT -8
I'm working on a better way (at least better than the way I did it last time) to make that dratted double bend at the poppet end of my levers. Voit designers did it for a reason, maybe to raise the lever up higher to keep things from interfering with each other or to gain a bit of poppet movement. Not sure, but they didn't do it for fun. I have a new one in the works, but it was just too hot today to spend much time at the machinery. I used my new drillpress setup and a hole saw to cut the IP adjuster clearance out of a piece of scrap stainless, filed, ground, and hacksawed the new lever shape partially, then gave up. Ugh. Back to 90 degrees outside and way more in the garage. I didn't even go for my daily hike in the woods. I think the intent was to extend the leverage of the lever. By making the double bend, they opened the valve from the opposite side, and that gave more mechanical advantage in a very limited space. John |
|
|
|
Post by vance on Sept 14, 2020 13:15:12 GMT -8
I spent part of the day finishing the new second stage and levers. It came out well. This is the lever that I posted as a blank a couple posts back. 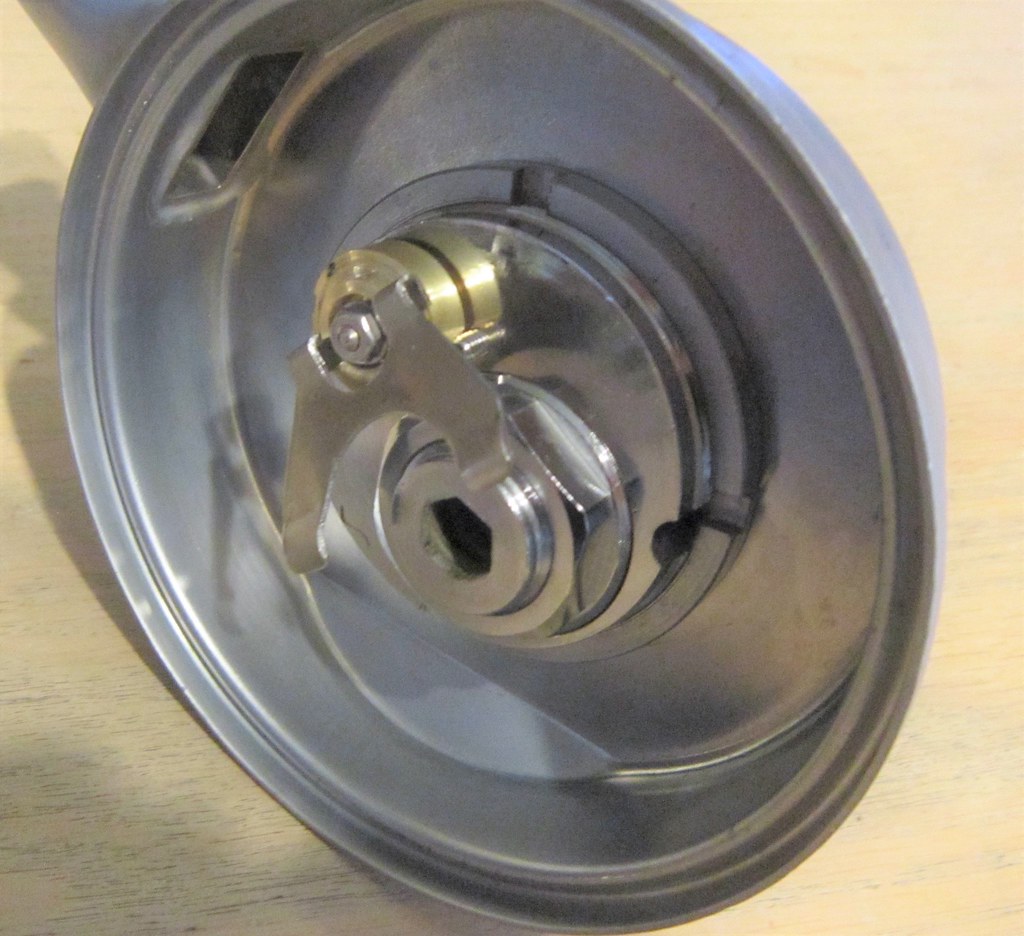 |
|
|
|
Post by vance on Sept 14, 2020 13:54:58 GMT -8
I'm working on a better way (at least better than the way I did it last time) to make that dratted double bend at the poppet end of my levers. Voit designers did it for a reason, maybe to raise the lever up higher to keep things from interfering with each other or to gain a bit of poppet movement. Not sure, but they didn't do it for fun. I have a new one in the works, but it was just too hot today to spend much time at the machinery. I used my new drillpress setup and a hole saw to cut the IP adjuster clearance out of a piece of scrap stainless, filed, ground, and hacksawed the new lever shape partially, then gave up. Ugh. Back to 90 degrees outside and way more in the garage. I didn't even go for my daily hike in the woods. I think the intent was to extend the leverage of the lever. By making the double bend, they opened the valve from the opposite side, and that gave more mechanical advantage in a very limited space. John Hmmm. I don't follow. The lift point is the same as the flat version, at the back. The difference is that the whole lever is raised up on the "feet", but it still pivots at the front? Does raising the fulcrum help? |
|
|
|
Post by Terry on Sept 14, 2020 15:38:19 GMT -8
Hey Phil that second stage assembly is looking real good, and I'm thinking you've got that lever manufacturing down to a science. Interesting thread.
|
|
|
|
Post by vance on Sept 14, 2020 15:45:14 GMT -8
Thanks, Terry. One of these levers takes about two hours to make. As I get better, maybe I'll get it down to 1. I have figured out the best way (so far) to get the double bends at both ends, but it's still a PITA. I need to make 1 or 2 more, so maybe the time commitment will drop?
|
|
|
|
Post by SeaRat on Sept 14, 2020 15:52:27 GMT -8
I think you get an advantage in lever length as well as leverage with the double bend.  Trieste Lever Diagram001 Trieste Lever Diagram001 by John Ratliff, on Flickr This is from my mind, not measurements. But it does show that to get to the correct centering, you have an advantage, and you also get an advantage in lever length (7.5 units verses 6 units in the diagram). So from what I can tell, it is a longer lever in a shorter space. John |
|
|
|
Post by vance on Sept 22, 2020 12:38:37 GMT -8
I finally got around to drilling the jets on the new second stage. I just tried it out on a tank, and it seems to work perfectly. I drilled only 2, 1/8" jets in this one, without the 2, 1/16" secondary jets. I didn't get the expected over-venturi action. I'm thinking this is due to the slight offset I positioned the jets. I made them point a bit more to the side of the intake horn, rather than straight down the pipe. Most commercial regs have an offset jet.
I have noticed that the venturi effect can be considerably affected by the position of the second stage in relation to the air horn. My Dacor conversion and the Titan II mounted in FX cans don't have a means of keying the first stage in the top can. Sometimes they get turned off center when being handled on a tank. Just a slight misalignment will essentially kill the venturi effect. I've made register marks on those so I can be sure they are centered. I'll eventually figure out a good way to key them.
|
|
|
|
Post by vance on Dec 24, 2020 15:56:28 GMT -8
I just got around to getting JB's Titan III label printed. I only need one, but you have to buy 28. That's not bad at $23-ish shipped. I don't think I'm going to make 20-something more of these conversions, but I'll have extras?
I will post a photo of the reg/label when they arrive.
I do have 2 more Titan IIs and 2 more orphan Mistral top cans. So maybe I'll only have 25 extra labels?
|
|
|
|
Post by vance on Jan 2, 2021 14:16:47 GMT -8
Oh, yeah. Here's JB's label in the flesh.  |
|
|
|
Post by technidiver on Jan 5, 2021 16:11:42 GMT -8
Oh, yeah. Just got around to seeing this post now and wow, that label came out great! Is the titan conversion something that could be done more often in the future? Also, could it take DA cans? TD |
|
|
|
Post by vance on Jan 5, 2021 18:49:04 GMT -8
I have 4 Titan III conversions. One is set up in plastic FX boxes, one in a modded Mistral top, one in James' 3D boxes, and one is waiting in the wings. I much prefer the Mistral and the 3D versions b/c you can leave a locating tab, which makes a big difference. Also, another big plus for me is being able to use a DBE/exhaust mushroom.
I also made a Dacor Olympic DH conversion, which I fitted in FX boxes, like one of my Titans. Both work well, as long as the orientation of the second stage jet isn't turned off-center. There is no indexing scheme with the FX boxes, and the box can be rotated on the first stage body by handling.
You all know how it goes while handling and donning equipment. If the box gets rotated so the jet is out of alignment, it can affect the performance dramatically. A way to fix the first stage in position is needed.
In answer to the DA box question, the DA box has an offset hole. This will not work well with the Titan conversion. The regulator will be off center, and I have no idea if you could salvage a tab, due to the unchangeable first stage orientation with that fixed yoke.
|
|
|
|
Post by vance on Jan 6, 2021 11:47:28 GMT -8
I just checked the alignment of the Titan II body and tabs on a DA box. That won't work, as is. However, it got me to thinking if it might be a relatively easy way to index the Dacor conversion. On the Trieste and the DA type bodies, there's a milled cut in the side as you can see at the top of this photo:  This is where the tab on the box fits to keep the valve body from rotating in the box. Cuts could be made on the Dacor body to fit one or both of the tabs on a DA box. This aligns very well! Cutting two for both the tabs would make the DA box fit w/o modding it. The most obvious problem with this is the offset hole in the DA box. It would move the regulator off center in relation to the tank valve. Since it's only about .5", I don't think it would make much difference, in use. It might look funny... Actually, a new slot(s) could be cut into a Titan II body as well, but I don't think I'd do that. |
|
|
|
Post by vance on Jan 9, 2021 9:23:02 GMT -8
I'm thinking about a thin washer with tabs glued to the FX boxes for alignment/fixing in place. If the washer was fitted on the outside of the box, the over-all lever movement would be increased by a tiny amount.
Cutting those would certainly be a pain. 3D printing might work, but for it to be thin enough, 3D printing might not yield a strong enough part.
Another idea which occurred to me was making cutouts in the rim of the hole for double ended tabs and gluing them in. That would certainly be easier to do, but the glue would need to be firm and stick very well.
|
|
|
|
Post by herman on Jan 9, 2021 19:40:33 GMT -8
How about milling a small slot in both the body and the cans (drill down with an end mill to flush with the lip of the reg)then You could trap a washer in under the body ring, using it as a key to keep the parts from rotating.....better yet, drill and tap a small hole in the lip of the reg in the center of the milled hole and insert a small (4-40??) cap screw to act as a key. You might have to trim the head of the cap screw down a little but it should work
|
|
|
|
Post by vance on Jan 10, 2021 12:27:50 GMT -8
Good ideas! Thanks for the suggestions (which I was hoping for).
That's pretty much what I envisioned about cutouts in the box that correspond with first stage cutouts. I was thinking of gluing the tabs in, but you're right. All you really need to do is trap the tabs (or washers). It would probably firm things up and ease installation by gluing them in place with JBWeld, though.
A fillister head screw or a custom threaded pin that fits through the plastic and into the first stage rim (sorta like the Mistral pin) might work, too, but there's very little meat to work with, and leaking might be an issue.
|
|


