|
|
Post by Tusker on Jan 16, 2023 18:21:36 GMT -8
Do you have a Mistral or a GL? I have always maintained that the GL is slightly superior to the Mistral (both using a USD hoseloop), given it is adjusted properly. This is very fussy. Both are excellent breathers, but the Mistral is easier to adjust. The GL doesn't have a Mistral-like o'ring at the top of the valve. The only o'rings in the GL are around the hard seat, and as a spacer in the sintered filter stack, under the reserve fitting, if I remember correctly. These o'rings don't require a specific hardness. Just get some that fit. I've got a Gold Label and all the nice new silicon parts it needs. I was planning on using my current hose set until I can get ahold of another one in black for it. I've taken it apart and laid all of the parts out in comparison to a schematic, I just didn't have the right O-rings to replace the old — probably a good excuse to get a sizing cone. I know I could buy a set from TSM, but I need to buy more O-rings anyway and may as well end up with a lifetime supply. Jacob I thought I'd migrate and elaborate on my question here so that it will hopefully be easier to find for those looking for the same information in the future. Herman worked out that the two O-rings in the Gold Label should be an 11N90 for the HP seat and a 12N90 between the non-restrictor plate and the filter. The 11 on the valve seat is where I'm having issues — when installed onto the valve seat it won't go all the way down in the valve body assembly, meaning I can't complete the reassembly. The old O-ring sits flush with the edges of the valve seat, while the new one sticks out a small amount. Anyone have any ideas? Jacob |
|
|
|
Post by herman on Jan 17, 2023 3:12:29 GMT -8
The 12 can/should be a 70 durometer and will likely go together easier since there is basically no pressure across is.
The oring around the seat should be proud of the seat by about half of the width of the oring and require some encouragement to go in the hole, silicone helps.
|
|
|
|
Post by vance on Jan 17, 2023 8:59:40 GMT -8
Yes, it will stick out a bit. Just press down on the seat with a wooden dowel or something plasic. A chopstick would be suitable. Don't use brass or any other metal. It might take a bit of pressure.
The seat is two-sided. Pick the smoothest side.
|
|
|
|
Post by Tusker on Jan 17, 2023 9:47:28 GMT -8
I figured a little encouragement was necessary, so I took something plastic and pushed on the seat. When it didn't budge, I graduated to a rubber mallet which also did not move it any.
It turns out I have no 12s, so I will revisit this after placing an order with McMaster for all of the O-rings I need. Should have an update soon!
Jacob
|
|
|
|
Post by vance on Jan 17, 2023 11:41:59 GMT -8
Definitely use silicone grease!
|
|
|
|
Post by vance on Jan 20, 2023 15:14:02 GMT -8
Speaking of GLs, a nice one I recently sold to a guy is back on eBay. I wonder why. I guess vintage diving isn't for everyone.
|
|
|
|
Post by Tusker on Mar 21, 2023 6:06:11 GMT -8
I finally got back around to making a second attempt at getting that valve seat in — it took a lot more percussive persuasion and grease than expected! It finally went though and the rest of the reassembly went very smoothly. I put it on a tank to check the breathing afterwards and it was abysmal. I've had better luck breathing through straws. I tried one adjustment only to make it much worse, so I went back to what I thought was the original setting. I took a big pull only to then get a great big gush of air. Quite surprised, I breathed normally on it and found it quite nice so I have elected to leave it be until testing it in the water.  Jacob |
|
|
|
Post by SeaRat on Mar 21, 2023 8:16:40 GMT -8
Jacob, Glad to hear that it's back in order. 'Hope it works out for you on a dive soon. Here is my Hybrid Healthwasy Gold Label, which is a first generation Scuba with the guts of a Gold Label:  Healthways Scuba Hybrid3 Healthways Scuba Hybrid3 by John Ratliff, on Flickr  Healthways Scuba Hybrid5 Healthways Scuba Hybrid5 by John Ratliff, on Flickr The reason, is that I like the Healthways Scuba exhaust system. I made some calculations of the exhaust system on the original Healthways Scuba:  Healthways Scuba Exhaust Calcs Healthways Scuba Exhaust Calcs by John Ratliff, on Flickr I calculated that it takes only 1.89 ounces of pressure to close the exhaust for the Healthways original Scuba. 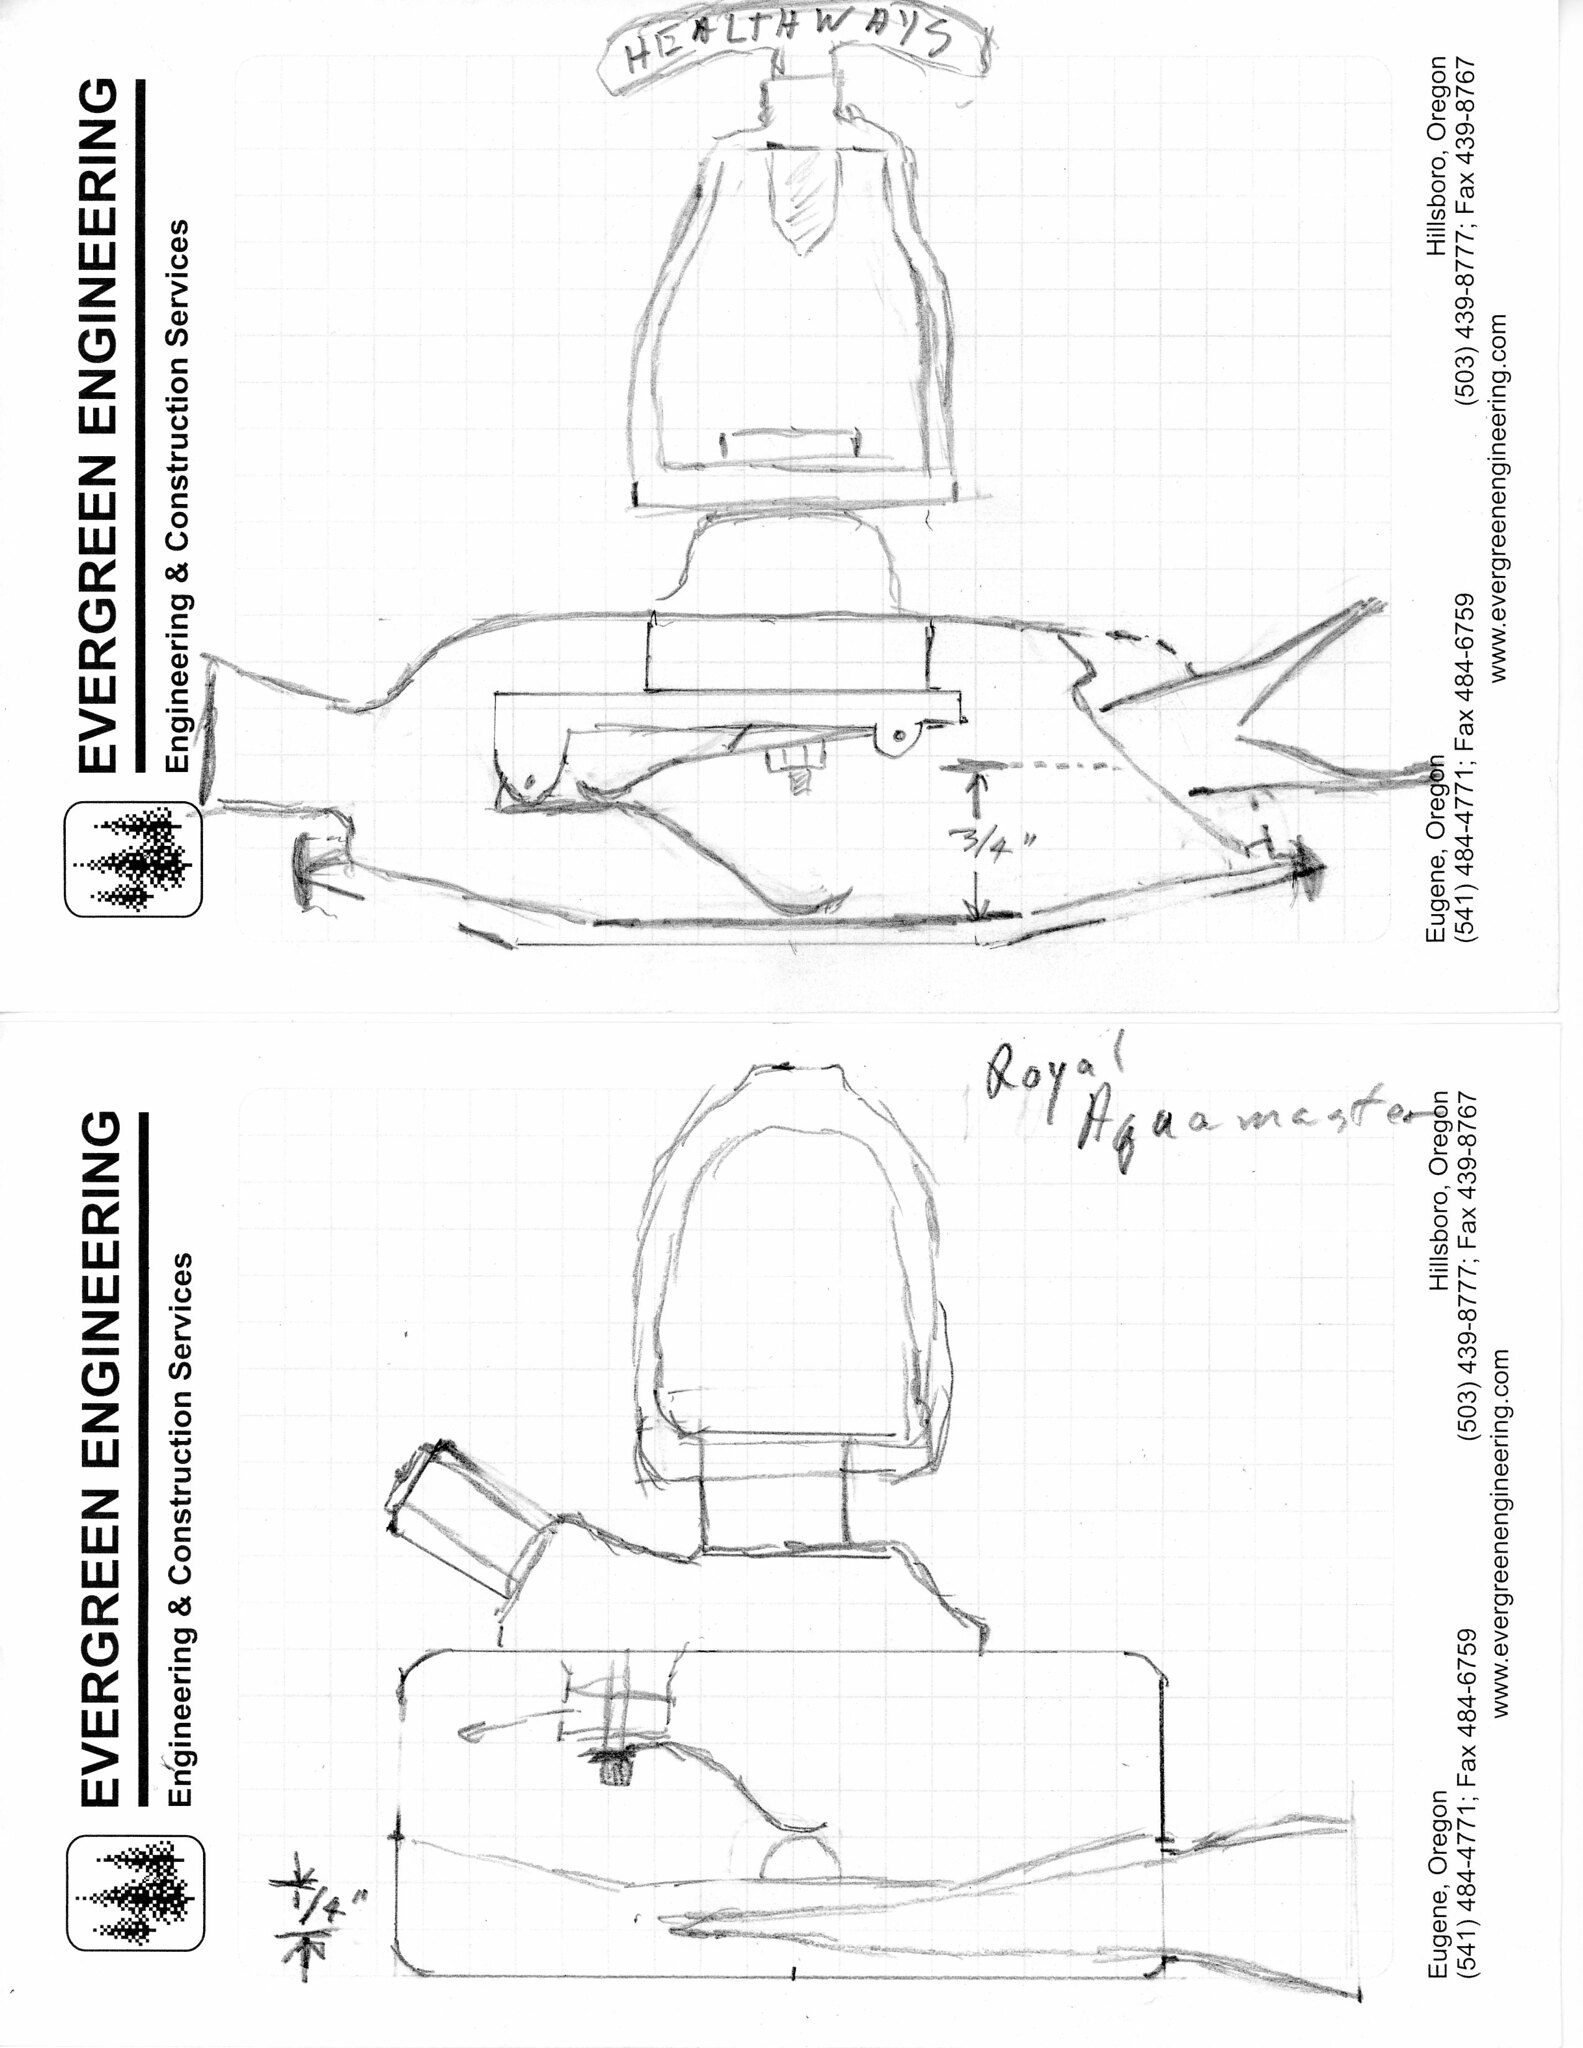 SCUBA vs Aquamaster001 SCUBA vs Aquamaster001 by John Ratliff, on Flickr It also has a 3/4 inch to one inch advantage in the water column over the U.S. Divers Company exhaust that Cousteau patented all those years ago.  IMG_1549 IMG_1549 by John Ratliff, on Flickr Mine breaks at about 1/2 inch suction pressure, and out-performs a USD Mistral. john John |
|
|
|
Post by nikeajax on Mar 21, 2023 11:01:50 GMT -8
Jacob, if you get one of James' & Phil's Snorkeljets, you can get an excellent approximation the Gold Labels performance out of a Scuba Model-A (original Scuba) if you ever get the chance to buy one. Your GL just needs some fine tuning, just be patient with yourself my friend  JB |
|
|
|
Post by vance on Mar 23, 2023 7:34:31 GMT -8
I've described the adjustment process before, but this is a good place to do it again.
I like to use a setscrew with an allen head rather than the slotted type. The screw is a stainless 10 x 32 tpi, about 3/8" long and can be found at Home Depot, etc. The reason for the allen head is so you can use the key as a "clock hand" to keep track of the screw's position.
I use a small box end wrench to hold the nut and place the allen key in the screw at the same time. Set the screw to raise the lever about 1/4" above the lip of the box. Just sight across the box and make a rough guess. Tighten the nut, note the position of the key and take the tools off.
Place the diaphragm on the regulator. If the edges are held up so the circumference of the diaphragm doesn't sit on the rim of the box, readjust by lowering the lever until it does. If the diaphragm sits flush on the rim, but has a significant gap between the disk and the lever tips, raise the lever.
What you want is to feel a very slight gap when you tap lightly on the top of the diaphragm. The best description I've been able to come up with for the feel is it's like when you lightly tap on the end of a keyboard spacebar. There's a definite but tiny gap.
Be aware that tightening the nut will slightly lift the screw, so you want it to be tight when you do the feel test. As DRW would remind us, "Mind the gap!" There is a sweet spot that you have to find for this regulator to live up to it's reputation!
This works well for diaphragm adjustment on most DH regs.
|
|
|
|
Post by vance on Mar 23, 2023 7:44:18 GMT -8
I finally got back around to making a second attempt at getting that valve seat in — it took a lot more percussive persuasion and grease than expected! It finally went though and the rest of the reassembly went very smoothly. I put it on a tank to check the breathing afterwards and it was abysmal. I've had better luck breathing through straws. I tried one adjustment only to make it much worse, so I went back to what I thought was the original setting. I took a big pull only to then get a great big gush of air. Quite surprised, I breathed normally on it and found it quite nice so I have elected to leave it be until testing it in the water. Jacob FYI, the regulator is way too high in the backpack as it is. It should be lowered until it's behind the handle, if it will fit. These blow mold plastic packs aren't the best for DH diving without mods. I cut the handle off of one of mine because it interfered with positioning the reg properly. I suppose spacers could push the tank band away far enough to get the reg past the handle, but never tried that. |
|
|
|
Post by SeaRat on Mar 23, 2023 9:10:19 GMT -8
That is why I like my doubles for double hose diving--positioning.  IMG_1423 IMG_1423 by John Ratliff, on Flickr John |
|
|
|
Post by Tusker on Mar 23, 2023 18:03:00 GMT -8
I've described the adjustment process before, but this is a good place to do it again. I like to use a setscrew with an allen head rather than the slotted type. The screw is a stainless 10 x 32 tpi, about 3/8" long and can be found at Home Depot, etc. The reason for the allen head is so you can use the key as a "clock hand" to keep track of the screw's position. I use a small box end wrench to hold the nut and place the allen key in the screw at the same time. Set the screw to raise the lever about 1/4" above the lip of the box. Just sight across the box and make a rough guess. Tighten the nut, note the position of the key and take the tools off. Place the diaphragm on the regulator. If the edges are held up so the circumference of the diaphragm doesn't sit on the rim of the box, readjust by lowering the lever until it does. If the diaphragm sits flush on the rim, but has a significant gap between the disk and the lever tips, raise the lever. What you want is to feel a very slight gap when you tap lightly on the top of the diaphragm. The best description I've been able to come up with for the feel is it's like when you lightly tap on the end of a keyboard spacebar. There's a definite but tiny gap. Be aware that tightening the nut will slightly lift the screw, so you want it to be tight when you do the feel test. As DRW would remind us, "Mind the gap!" There is a sweet spot that you have to find for this regulator to live up to it's reputation! This works well for diaphragm adjustment on most DH regs. Thanks for detailing the process Phil! I'll update when I get that down. As for the backpack, don't worry — I was just using the tank to test the reg. I dove a double hose on one of those packs one time and have no desire to do so again any time soon. Jacob |
|
|
|
Post by spirou on Mar 24, 2023 8:52:45 GMT -8
I finally got back around to making a second attempt at getting that valve seat in — it took a lot more percussive persuasion and grease than expected! It finally went though and the rest of the reassembly went very smoothly. I put it on a tank to check the breathing afterwards and it was abysmal. I've had better luck breathing through straws. I tried one adjustment only to make it much worse, so I went back to what I thought was the original setting. I took a big pull only to then get a great big gush of air. Quite surprised, I breathed normally on it and found it quite nice so I have elected to leave it be until testing it in the water. Jacob FYI, the regulator is way too high in the backpack as it is. It should be lowered until it's behind the handle, if it will fit. These blow mold plastic packs aren't the best for DH diving without mods. I cut the handle off of one of mine because it interfered with positioning the reg properly. I suppose spacers could push the tank band away far enough to get the reg past the handle, but never tried that. |
|
|
|
Post by spirou on Mar 24, 2023 8:57:58 GMT -8
Hello Jacob, I experienced the same problem as you, when I wanted to use double hoses. I now use a soft plate, with a harness, where the "Frédéric Dumas" strap of the spirotechnique.
Two things are important, to be comfortable with DH, the reg must be close as much as possible from your lung, and between the shoulder blades.
|
|


