|
|
Post by Terry on Jan 4, 2014 11:56:51 GMT -8
Well I finally bought my first compressor; after all at age 66 I think it's about time I did. This past week I was watching this Cornelius 130R1500 on ebay and decided to buy it. I made sure to do some searches on the web first and after reading the positive comments that I did I decided that the asking price of $550.00 was fair and made the purchase. According to the seller it's supposed to be in good working order and properly performs the work that it was intended for. I should be receiving it around Tuesday; so I'm really anxious for it to get here so I can start "playing"! I managed to print out a copy of the manual for this compressor from The VDH website, and I'll be sure to study it from cover to cover. As I indicated this is my first compressor, and I know absolutely ZERO about compressors; so any input, advice; recommendations or comments any of you have to offer will be greatly appreciated.  Terry |
|
|
|
Post by SeaRat on Jan 4, 2014 16:43:19 GMT -8
Terry, I'd buy a carbon monoxide sensor for the compressor if I were you, or buy one you can test your tanks with. We've been having quite a discussion on this on the ScubaBoard Accidents and Incidents website. Read through the whole thread to get the thoughts about CO and compressors. By the way, congratulations on getting the compressor. If I did that, I would be able to fill my UDS-1 system. Right now, it's assembled, but no visual inspection as there are no eddy current testers for the 1" openings. John |
|
|
|
Post by Terry on Jan 4, 2014 19:56:17 GMT -8
Good suggestion John; that's something I've already been giving some thought to. The compressor I bought is an electric; but if my understanding is correct CO can also be a problem with an electric driven compressor as well as a gas driven one. I'll be sure to take a look at the thread you mentioned, and also looking for a sensor to test the air quality. As I stated; this is a new area for me so "THANKS" for the suggestion.
Terry
|
|
|
|
Post by SeaRat on Jan 4, 2014 22:44:11 GMT -8
|
|
Deleted
Deleted Member
Posts: 0
|
Post by Deleted on Jan 5, 2014 10:49:54 GMT -8
terry
The first thing to do is repack the filter canister with fresh charcoal.........I haven't seen how that model is set up but I suspect that it does not have an independent dryer, just a single tower that houses some felt discs and carbon filter granules.........The charcoal granules you can get cheap through an aquarium store, the discs you might have to cut yourself if the tube is an odd size, that all this fits in.
I use Dremel felt polish discs with a stainless bolt through the center holes to hold them together and wrap them in a clean felt square to fill in the space between the discs and the tower wall. That filters small particles.
The charcoal is for carbon monoxide and other nasty stuff.
Once you open the tower up, you will know what I am saying here.
If you have not contacted James Sheldon at "Compressor_Team@yahoogroups.com" .......he can give you a lot of advice and info.....perhaps have the pieces you need as well for the filter tower.
He can advise you how to set up a dryer tower as well if yours does not have one.
Mossback
|
|
|
|
Post by cnotthoff on Jan 5, 2014 13:13:36 GMT -8
|
|
|
|
Post by Terry on Jan 5, 2014 15:22:48 GMT -8
Thanks Mossback and Charlie for the info you had to offer; I very much appreciate it. I'll be waiting to get a look at the filter system on this compressor to see what you're talking about Mossback, and I'll be sure to take a look at the link you posted Charlie.
John; I've read most of that thread that you mentioned, and boy does that offer some food for thought - talk about a "Whodunnit" mystery! As I was reading this thread I noticed that several different types of oils were mentioned to use on breathing air compressors; I'll have to check to see what type I'll need for this Cornelius. According to the manual that I printed off from The VDH website it says to use a medicinal grade, mineral base oil; I'll have to check into that and where to obtain this type of oil. Thanks again! Terry
|
|
|
|
Post by duckbill on Jan 10, 2014 0:45:26 GMT -8
Hi Terry. Congratulations on your first compressor. Being able to fill your tanks at home and not being at the mercy of the shops is liberating! Soon you'll be visually inspecting your own tanks (if you aren't already) that don't need to be stickered for fills while traveling. My compressor is a 130R1500 and I love it. I use Mobil Jet ll in mine. Anderol 500 and Chemlube 201 work well also. I perform an oil change every 25 hours of use. It only holds about a pint. Mine still runs about the rated 1.75 CFM. My fill times are approximately: 72 : 450-2475: 33 mins. 2X38: 300-1800: 35 mins. 2X50: 260-1980: 49 mins. The unit mounted coalescer really provides a bare minimum of air treatment. I have a separate filter stack that contains a refillable Bauer cartridge holding activated charcoal and Vaporshell 13X molecular seive (a mechanical dessicant). A back pressure valve set at 1700-2000 psi really needs to be used to optimize filtration. I repack the filter annually, which is plenty for the amount of air fills I do per season. I don't know of any sources for the Purolator AN 6237-1 paper pre-filter, so I make my own. If you run the compressor in a clean environment, the prefilter will be usable for several years. Here's how I made mine: 1) Use WIX 33264 (fuel filter) 2) Use razor blade to cut straight across the filter paper where one of the metal end caps is attached. Use snips to cut the metal paper clip. 3) Cut from heavy card stock (backing on a pad of paper) a 1 1/8" disc (Use 1 1/8" template and cut inside the line). 4) Hot glue end of filter to disc. 5) Cut the other metal filter end cap off as before, and cut the paper clip as before. 6) Cut another heavy card disc at 1 3/8" (Use 1 3/8" template and cut inside the line) with a 1/2" hole in the center. 7) Hot glue the open end of the filter to the second disc. 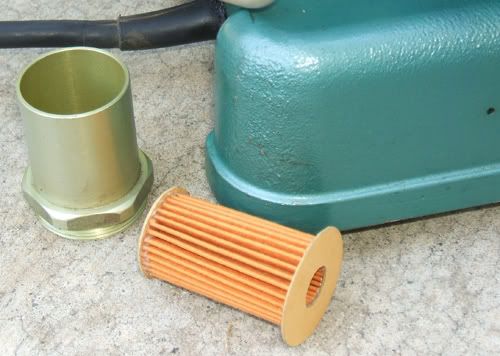 |
|
|
|
Post by Terry on Jan 10, 2014 19:14:51 GMT -8
Thanks Duckbill for your comments and info you had to offer. I saw your post early this morning and this is the first chance I've had to respond. Well; after this winter weather finally allowed UPS to resume their deliveries I finally received my compressor late in the day Wednesday, and I'm now trying to get familiar with it. I was surprised to see 2 fill whips attached to this compressor; one which comes off of the filter separator assembly, and the other is actually attached to the intake of the first stage. Why the owner had one attached to the first stage is beyond me. I'll have to take a closer look at it to make sure and see if there is even an intake filter there. I'm assuming if there isn't any filter that I should be able to adapt something to work in it's place just as well. But again I have zero experience with compressors and as I examine it further I'll be able to see exactly what I've got. I also noticed that the previous owner had attached a shutoff valve to the filter separator assembly which he then had the fill whip attached to. Both of these hoses were the steel braided outside casing type of hose, and after I give them a good examination I may use one of them; or I may very well just buy a new hose with a yoke that has a bleeder valve and pressure gauge. As for the pre filter I may very well just follow your advise and make my own. Right now I'm just busy giving it a good cleaning since it was covered with oil when I opened the box. The guy I bought it from had drained the oil for shipment and put it in a quart container which appeared to have leaked somewhat and gotten oil all over. I have had several emails with him since and he was not the one who used this compressor so he had very little knowledge of it. He was able to tell me though what that second hose was for and after checking it out I was able to see for myself. I might be wrong; but it would seem to me that having a 5' intake hose attached to the intake would create more work for the compressor to easily draw in air??? I also asked him about the oil, and he wasn't sure if the oil that was in it was oil intended for breathing air compressors or not. That didn't make any difference though; because I had no intention of using it anyway; I planned on getting some Mobile Jet II or one of the others that have been recommended. Anyway I hope to spend some time with it this weekend so I can get a better idea of what exactly I'm dealing with such as the filter issues and fill whip. If any of you have a whip with yoke, bleeder valve, and pressure gauge for sale let me know; I might be in the market for one. Thanks again for your post; ALL OF THE INFO has been very helpful, and very much appreciated. I've been diving and familiar with scuba since 1963; but remember you guy's are dealing with a novice here when it comes to compressors. I can already tell that this compressor is going to make me put out the WELCOME MAT to "The Mother Of Invention". Heah; this could really turn out to be a fun winter project!   Terry |
|
Deleted
Deleted Member
Posts: 0
|
Post by Deleted on Jan 14, 2014 9:07:44 GMT -8
Terry,
Glad you finally received your compressor.........it is fun just learning how those things work and more fun when you fill your first tank........
About the 5 foot intake hose........I am presuming your compressor is gas motor driven.......if so, that hose is to be attached and directed up wind away from the exhaust of the gas motor...........I have a ten foot hose and it does not present an issue to the compressor sucking air........the issue is keeping bugs out.......I keep paper towel wads stuffed in the ends when not in use....foam plugs are probably more sophisticated but paper towel wads work and are cheaper, just steal them from my wife's roll of paper towels in the kitchen when I need them.
That hose off the reg. could be for tire fills, etc.
Have fun guy........I suspect you will be one happy camper after your 100th fill or so..........my 100th was the bench mark for the cost......now my fills are almost free.......
Mossback
|
|
|
|
Post by Terry on Jan 14, 2014 15:31:49 GMT -8
Thanks for your comments Mossback, and you're right it's fun learning how these things work and also enjoyable restoring another functional piece of vintage equipment. I guess that I forgot to mention in my earlier posts that my compressor is 110v electric; so that's why I questioned the extra hose on the intake. I understand what you're saying about using this hose as a snorkel to prevent taking in any CO with a gas driven compressor; but not an electric. Since my last post I've also confirmed that I do not have the air intake filter assembly; but that's not a problem. I've been looking at some Solberg compressor filters which are also listed as filter / silencers and the use the replaceable filter elements as seen on some of the newer compressors. The one's I'm looking at have an 1/4" nipple and are about 2 - 2-1/2" in diameter and shouldn't be any problem to fit to this compressor. I also want to pick up some oil for this so I can fire this baby up; but I'm not sure if I am able to purchase this type of oil locally; I'm thinkin' I'll probably have to order it. When I go into Traverse City for the inlet filter I'll check for oil while I'm there as well. I've got a few other minor things I want to do to it, and then it's time to move on to the separator to see just how it works and whether I have any final filtration there or not. Just taking it one step at a time, and learning as I go; and hopefully I'll be hooking it up to some tanks in the near future. I also want to get a new fill whip with pressure gauge and bleeder. Thanks again! Terry
|
|
|
|
Post by duckbill on Jan 14, 2014 23:27:19 GMT -8
"I'm not sure if I am able to purchase this type of oil locally"
Municipal airports often stock Mobil Jet ll synthetic oil. That's where I found mine locally.
|
|
|
|
Post by Terry on Jan 15, 2014 15:58:09 GMT -8
Thanks for the info Duckbill. I'll be sure to check with the folks at Cherry Capital Airport in Traverse City if need be. Terry
|
|
|
|
Post by Terry on Jan 18, 2014 19:45:27 GMT -8
Well progress has been slow; but sure. So far I've given this compressor a good cleaning which it definitely needed; replaced the footpads, power cord and also the missing intake filter with a new Solberg filter. I also have some Mobile Jet II oil on the way, and hopefully I'll get to fire this baby up some time this coming week. Today I finally managed to take off the filter / separator assembly and boy was that a job getting the top unscrewed off of the tower shell. I finally managed to get it opened and was surprised to find out that there was no charcoal or any felt discs inside. Talk about stink; I don't thing this tower had been drained in a while and the oily moisture that was settled at the bottom definitely had an odor all it's own. Anyway the filter / separator assembly I have appears to be exactly like the one shown in the Cornelius manual for this compressor; which doesn't show any charcoal or felt discs. The filter reminds me of the same material that fish tank bubblers are made of, and in the manual it is referred to as an porous quarts filter element which is supposed to absorb all moisture and oil vapor. When I removed this part it appeared to be in very good condition; but it has oil all over it. I sure some of the oil that was still in the separator tank got all over this filter during shipment since I doubt that the package was always in an upright position during shipment. Do any of you have any recommendations as to how I could clean this element; I was wondering if soaking it in warm water with dish soap would maybe cut the oil and clean it up. Also I was wondering if there are any recommended methods as to adding charcoal to this system for additional. I was all set to use Mossback's recommendation until I opened this up and discovered how this was set up. This has definitely been a learning experience; but also a lot of fun. I've been intentionally taking this project slow; trying to learn what I can and hoping by doing it this way I can avoid any unnecessary mistakes that could lead to bigger problems. Thanks for all the info you guys have offered, and I'm open to any suggestions as to what any of you would do with this filter / separator. Terry
|
|
|
|
Post by duckbill on Jan 19, 2014 0:43:52 GMT -8
The filter/separator (coalescer) unit that is attached to the compressor really isn't supposed to be disassembled except to replace the rubber o-ring, which it rarely needs. I haven't had to replace mine yet, and I've heard they are a real bear to get apart, as you found out. The quartz filter collects water and oil which runs down its sides and drips into the receptacle for draining. It isn't something that requires cleaning normally. I would gently wash it with DISTILLED water and reassemble the unit. I don't know how soap would affect it. It should self-clean once air moves through it and more water accumulates in the pores and flushes them out. As I mentioned before, that coalescer only provides the bare minimum of filtration. The unit was designed to be used as it was with a whip directly to a cylinder, but don't be surprised if you get some rust in your steel cylinders, especially if stored full in cold temperatures. Eventually, you really need to get some type of in-line filter that has descicant and activated charcoal media, and, maybe more importantly, a back pressure valve, like this: 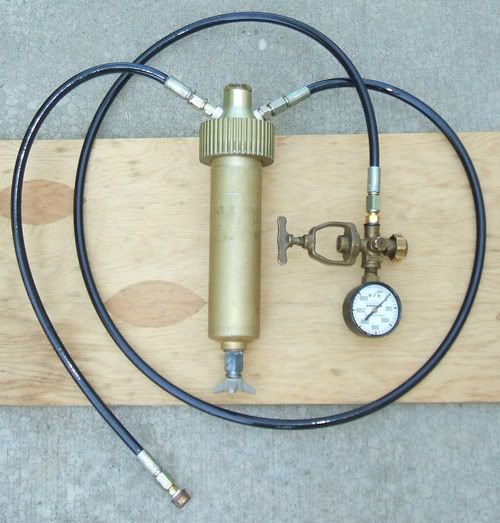 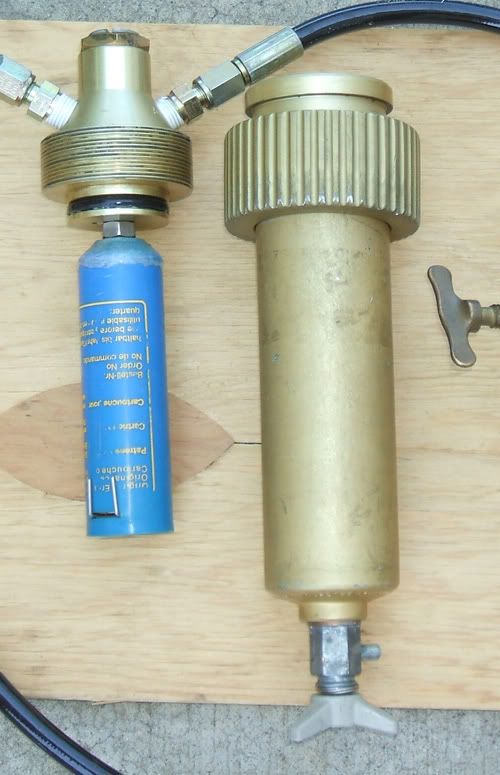 The housing is essentially a second separator, and the outgoing air runs through a refillable filter cartridge holding Vaporshell 13-X and activated charcoal, then out through a back pressure valve (seen as the adjusting screw and lock nut at the top of the unit) set at 1500-2000 psi. Back pressure allows the air to move much more slowly (same flow rate, but under pressure) through the filtration throughout the entire fill, providing much more efficient filtration. The Vaporshell 13-X is only efficient under pressure also. There are simpler in-line filters available, but try to make sure you are running whatever you use ahead of a back pressure valve of some kind....eventually. Even manipulating the tank valve to provide about 1000 psi back pressure during filling is better than nothing (assuming your whip has a pressure gauge attached). |
|


 Terry
Terry


 Terry
Terry
