|
|
Post by technidiver on Jan 4, 2019 19:43:54 GMT -8
Jay helped me find a Sherwood Selpac manifold with an outlet in the Center for a Double Hose and another outlet for a single Hose.
It's a bit stiff and corroded and I can't get one of the valves out of the Center piece. I don't want to wreck it. Any advice on the removal/disassembly?
TD
|
|
|
|
Post by cnotthoff on Jan 4, 2019 20:41:28 GMT -8
Heat is always good for stubborn parts. Any flame can overheat chromed brass, so I don’t use a torch. I like to soak the part in hot water. Soap or vinegar can be added to the water. I take the part out and start to work on it while it is still hotter than you want to touch. I avoid any penetrating oils since they will leave residue.
Good dives
Charlie
|
|
|
|
Post by vance on Jan 5, 2019 9:41:39 GMT -8
I'd like to see a picture! Couldn't find any examples on-line. I didn't look too hard....
|
|
|
|
Post by technidiver on Jan 5, 2019 10:26:44 GMT -8
I'd like to see a picture! Couldn't find any examples on-line. I didn't look too hard.... Phil, I'll send you an email of the manifold when I get home. I'm just on the road (at a Wendy's) and enjoying some lunch. TD |
|
Deleted
Deleted Member
Posts: 0
|
Post by Deleted on Jan 5, 2019 10:39:27 GMT -8
heat (air blower) gun might work for you. No risk of damage or discoloration from flame.
|
|
|
|
Post by nikeajax on Jan 5, 2019 11:55:46 GMT -8
Freeze for eight-hours, or over night, then wrap/insulate the posts with towels, then warm the inner portion right behind where you'd attach the wrench: this should allow it expand enough...
JB
|
|
|
|
Post by nikeajax on Jan 5, 2019 12:26:41 GMT -8
I think if you wrap the inner portion in aluminum-foil you might be able to use a propane-torch VERY BRIEFLY to get it hot. The magic happens with the two extreme temperatures...
JB
|
|
|
|
Post by technidiver on Jan 6, 2019 16:48:43 GMT -8
So I tried the regular freeze and dip method and it did not work. I'll try a heat blower gun next. Then finally the blow torch may be used. But only as a last resort!
TD
|
|
|
|
Post by nikeajax on Jan 6, 2019 17:23:24 GMT -8
OK, hopefully this will shed some light on what's going on, and what needs to be done? 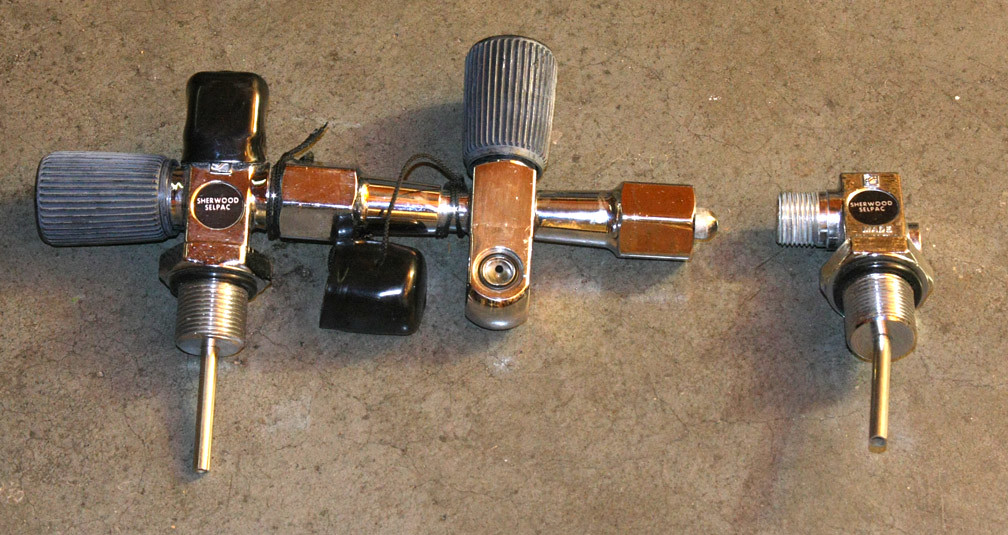 JB |
|
|
|
Post by SeaRat on Jan 6, 2019 17:44:34 GMT -8
Here's another couple of looks at this valve: 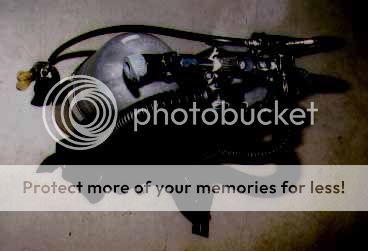  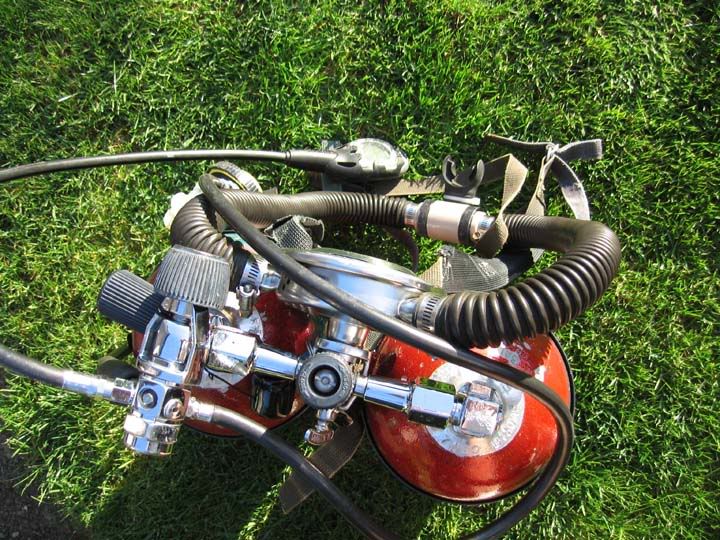 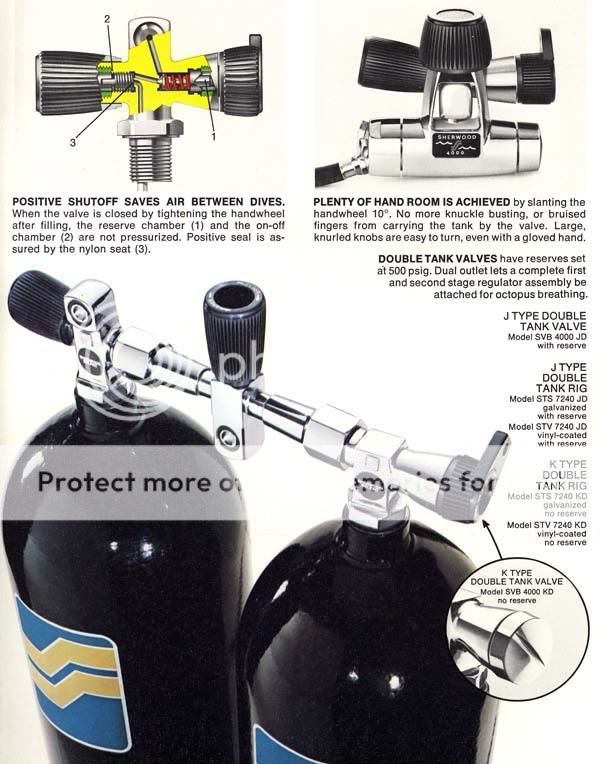 Be gentle with this valve, take your time, as it is a very valuable addition to your vintage diving to be able to use very old regulators with a complete single hose regulator as both a backup and a source of LP air, as well as having your SPG/computer hooked up for the dive. The valve mechanism is the same as is shown on the Sherwood diagram in their ad for the single tank valve, only situated vertically rather than horizontally. I think you are trying to get the hex nut off the top of the valve, or the side, after removing the on-off handle. If you use a socket wrench, which fits well. you should do minimal damage with force applied to the valve. I know some say don't use penetrating oil, but I'd rather do that than the heat method, as the heat method could permanently damage the valve if not done correctly, whereas the penetrating oil could be removed later with good cleaning techniques. John PS, those are the twin 50s that I have mothballed in the third photo down. They still look really good, and maybe I should bring them back sometime. |
|
|
|
Post by technidiver on Jan 6, 2019 17:50:13 GMT -8
Okay, so in Jay's picture the part of the manifold on the right of the photo is the part that is frozen. It will not come out of the manifold tee.
This manifold is very sturdy and very solid, however when I opened the internals most of the rubber parts had degraded and turned into a fine black dust.
John has an excellent point. This valve is unique in that it allows you to use a Double Hose on the Center piece and a single Hose that can provide an octopus, spg, and even a computer to your doubles setup.
Very unique and intuitive.
I glanced at some Sherwood parts kits on eBay and they look almost the same.
As for the brush discs, the yoke is rated to 3000 PSI so should I order some 3442 PSI burst discs as it's common for dive shops to over fill tanks (even though it's not safe and not recommended)
TD
|
|
|
|
Post by SeaRat on Jan 6, 2019 17:53:43 GMT -8
TD, Can you get the nut loose, or has it frozen too? The connection is brass on brass, with the nut being tightened very tight to ensure a seal (same as the old USD manifolds). If you can get the main nut loose, then use a penetrating oil to start breaking down the brass-on-brass corrosion, and it should come off. There is little chance of the oil getting into the main valve, as it must go through the hole first. 'Same goes for the nut itself; any penetrating oil put on it is outside the valve itself. I normally use a very large crescent wrench to both tighten these valves sides and loosen them. I'd use penetrating oil on them, let them sit for at least 24 hours, then loosen them with the crescent wrench. I normally do that sitting on the tank or putting a knee on the tank to gain leverage. Pulling towards me, using my body weight, allows a lot of force to be applied (you'll have to orient the tanks so that with the valve in place, pulling towards you is unscrewing the nut  ). It normally takes a lot of force, but if the nut is threaded correctly you won't damage the threads getting it off. The main thing is not to damage the threads ('just looked that up in the U.S. Navy Diving Manual, March 1970). It helps if, in this process, both tanks are used and are banded together as a unit. Otherwise, it's more difficult to apply straight force to the nut, as a twisting moment will be introduced in the process. I have used both 3000 psig burst discs (discs designed for tanks carrying 3000 psig) and 2250 burst discs (discs designed for tanks having a rated pressure of 2250 psig) on my set (I have them in 1800 psig tanks right now; I don't think you can get ones designed for 1800 psig). John |
|
|
|
Post by technidiver on Jan 6, 2019 18:54:33 GMT -8
John, the brass on brass connection and nut are all frozen. Only one side, with the valve port for the single Hose is not frozen.
I'll try the penetrating oil this week. I haven't really used in much on Scuba appliances as I've been warned it's not good to get that stuff on the plastic/nylon pieces!
I'll pick up some 3000 PSI burst discs too. I plan to dive this manifold with modern tanks (Alu 50s)
TD
|
|
|
|
Post by SeaRat on Jan 6, 2019 19:46:37 GMT -8
John, the brass on brass connection and nut are all frozen. Only one side, with the valve port for the single Hose is not frozen. I'll try the penetrating oil this week. I haven't really used in much on Scuba appliances as I've been warned it's not good to get that stuff on the plastic/nylon pieces! I'll pick up some 3000 PSI burst discs too. I plan to dive this manifold with modern tanks (Alu 50s) TD Just so you'll know, there are no plastic/nylon parts under the connecting nut. You'll find some nylon (I think) on the shutoff valve piece, but not on the J-valve. The parts that will be subjected to the penetrating oil are all outside the valves air passages, and should be fairly easy to remove afterwards. John |
|
|
|
Post by nikeajax on Jan 7, 2019 8:57:39 GMT -8
TD, carefully place it in a vice: you're wanting to have it stand on end. Next, carefully ad oil to the area where the threads are: on the opposite side feed the oil into tapered end. Do this on the other side, letting each application sit 24-hours. If you can do it twice each side before even attempting a removal I think you'd have better results.
JB
|
|


 ). It normally takes a lot of force, but if the nut is threaded correctly you won't damage the threads getting it off. The main thing is not to damage the threads ('just looked that up in the U.S. Navy Diving Manual, March 1970).
