|
|
Post by vance on Jul 14, 2019 16:54:52 GMT -8
More progress. I am pretty sure I'm going with the unthreaded, o-ring sealed idea (like a Dacor DH second stage) to sink into the first stage. It will be retained by screwheads on the flange of the hard seat carrier, and grooves in the second stage cap will hold it all in alignment.
Simple. (Cough.)
|
|
|
|
Post by technidiver on Jul 14, 2019 19:31:21 GMT -8
Let's see a picture when you get this step Phil!!!
TD
|
|
|
|
Post by vance on Jul 18, 2019 16:42:47 GMT -8
Still working on the jig. Had a couple set-backs when drilling into the body. The 1/4", next size pilot drill snagged and broke, causing some drama. This requires some more stabilization. Rookie mistake, I'm sure. Lots of gettin' jiggy wid it.
I cut the inside threads on the second stage, and all is good there. The second stage will need some calibrating, but I'm confident in it. The whole thing is dependent on the 1/2" drilling into the first stage. It should get done in the next day or two?
|
|
|
|
Post by vance on Jul 19, 2019 14:13:33 GMT -8
I drilled the second stage hole into the first stage. Whew! 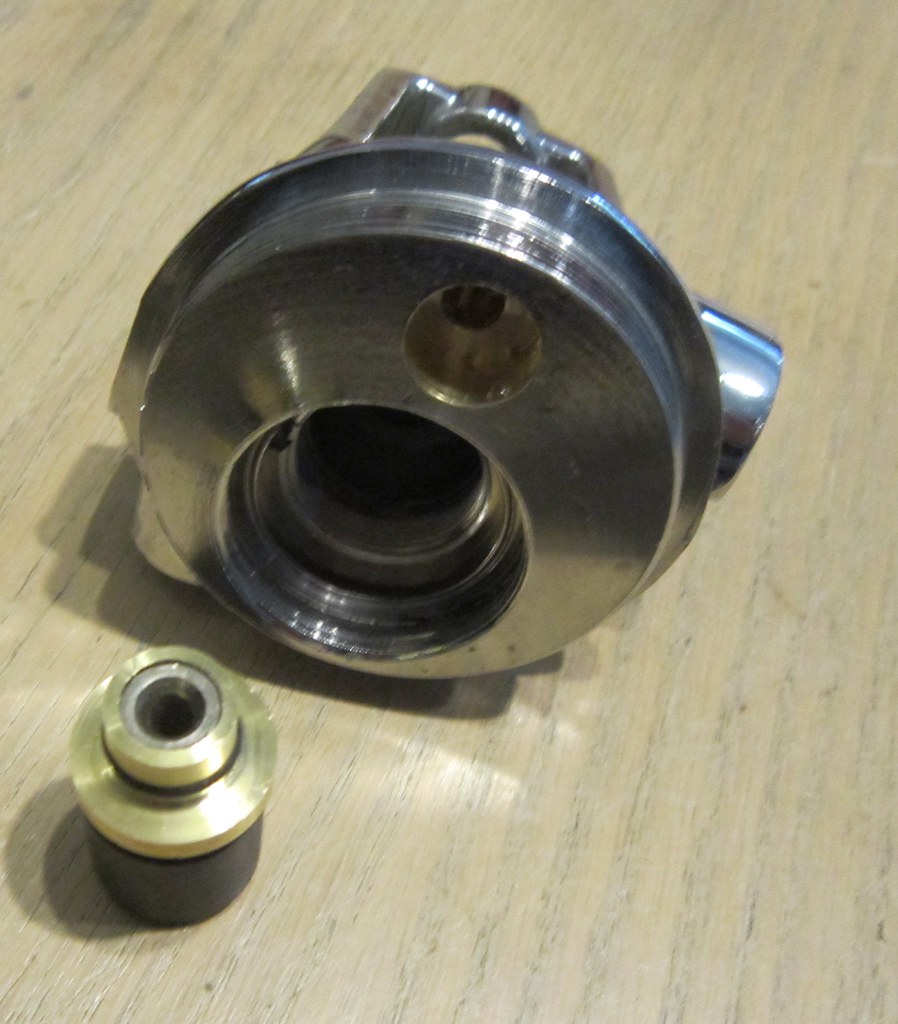 
 The second stage is sealed with an o-ring, and will be held in place by two screw heads that will engage the flange and a groove in the delrin part of the second stage body to keep it from turning. You can see the bottom of the removable seat in the carrier. The delrin part is way too long and will be cut down by half. Getting there! |
|
|
|
Post by nikeajax on Jul 19, 2019 15:32:19 GMT -8
Phil, congrats on the headway! What if instead of a screw to hold it down, you make something kinda "Y" shaped like they use on old distributors to hold them onto the block but still able to turn? Just brainstorming...
JB
|
|
|
|
Post by vance on Jul 19, 2019 16:24:22 GMT -8
Well, I was thinking along those lines earlier, but keeping things simple seems best. If I use screws, the screw heads will do two things: they'll hold the second stage down so it can't pop out, and will also keep the top part with the lever from wandering out of alignment. The lever cannot interfere with the IP adjuster nut.
Also, although you see clearance between the delrin top and the flange, there won't be any or much after the top is screwed down and adjusted, so there might not be room for the Y retainer.
The flange on the second stage's bottom part raises the s-s assembly height to about the same as the Titan II deck, which has a 3/16" or so higher deck level than the Dacor. This gives me some room to play with when finalizing the top cap's over-all height requirement for the LP seat carrier and spring. I can also thin the flange to gain some room if I need it. I'm playing around with which LP seat carrier I can/want to use. Because the interior diameter of the second stage bore is narrow, I'll go with a modded single hose seat carrier, as pictured above a few posts.
The major difference between my conversion and Herman's is in the second stage hard seat. I'm using an integrated seat from a single hose regulator's second stage. Herman installed the seat into the first stage. THE problem with this conversion is the bore drilled into the first stage. There just isn't much meat to work with, and drilling through the casting is easily done. You might notice that I shied away from the outside edge of the casting for my bore.
My solution was to use a modified single hose second stage that has a threaded hard seat integral to the second stage body, and to raise the assembly as high as possible. The bore into the second stage is as short and as narrow as I could get away with.
So far, so good.
|
|
|
|
Post by vance on Jul 19, 2019 16:39:15 GMT -8
So, the second stage starts out like this: 
  Then ends up like this: 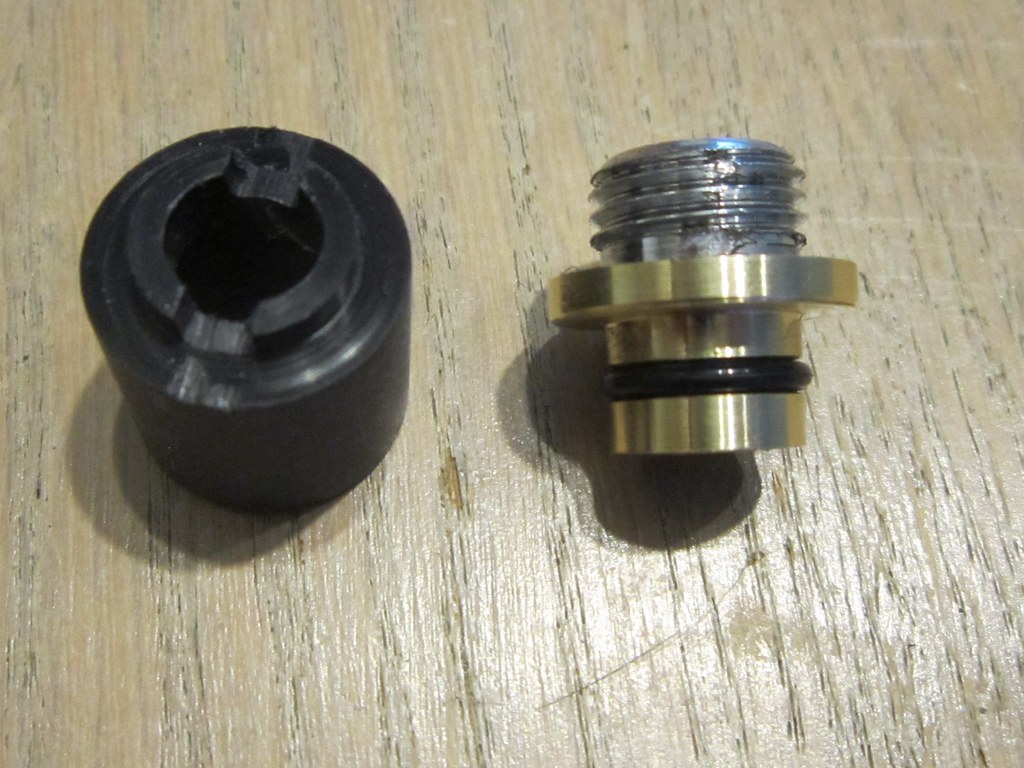 This one has an adjustable seat:  
The Delrin lever carrier screws onto the bottom section. |
|
|
|
Post by technidiver on Jul 19, 2019 17:15:52 GMT -8
The photos help me to understand what you're doing now Phil! Excellent work, as always!
TD
|
|
|
|
Post by vance on Jul 19, 2019 20:52:46 GMT -8
Thanks, TD. I'll keep you all posted as I go along!
|
|
|
|
Post by vance on Jul 26, 2019 15:54:29 GMT -8
OK, I've been quiet for a while here. Major re-thinking/simplifying going on. The single hose second stage idea lost its appeal. Too complicated/too high. I was seduced by the idea of getting the second stage seat integrated and up high to rectify the drill deep, break out of the casting problem. Trouble was, the seat is TOO high, and the second stage just wouldn't fit, contrary to my vision.
Solution: The hard seat has to be sunk into the first stage body. Here's what I've done so far. I carefully deepened the LP bore in the first stage. I made a new hard seat with an o-ring, much like a HW Scuba seat. Then, I threaded the first stage body for a 9/16 x 18 nipple, leaving a smooth surface at the bottom for the o-ring around the hard seat. The nipple will press the seat into the bore to prevent it being pushed upwards by air pressure. My second stage lever/seat carrier will still screw down onto the nipple as before. It will be retained from rotating by a set screw.
Unless I change the whole thing up again! Pics will follow!
|
|
|
|
Post by SeaRat on Jul 26, 2019 15:59:07 GMT -8
It sounds like this will work better. That's why we work through these designs, and "qualify" them. If they work out, that's great! If they don't, we've at least learned some things and can come at the problem from a different or slightly different angle.
John
|
|
|
|
Post by vance on Jul 26, 2019 16:17:42 GMT -8
Here's the hard seat installed: 
You are absolutely right, John. There's a lot of cogitating when you do these mods. If it don't work, let it go! I make a lot of leaps when in a semi-asleep mode in the early mornings. I get my share of inspiration via some deep subconscious thinking/obsessing! |
|
Deleted
Deleted Member
Posts: 0
|
Post by Deleted on Jul 27, 2019 8:32:19 GMT -8
That's how I designed the second stage orifice crown on the MB-Mk3, except instead of a oring I soldiered the seat in place to stop leaks past the threads. Problem is getting it's depth set correctly......is a real pain to measure and then soldier. Good Job Phil.
|
|
|
|
Post by vance on Jul 27, 2019 10:33:04 GMT -8
|
|
|
|
Post by vance on Jul 27, 2019 10:35:00 GMT -8
That's how I designed the second stage orifice crown on the MB-Mk3, except instead of a oring I soldiered the seat in place to stop leaks past the threads. Problem is getting it's depth set correctly......is a real pain to measure and then soldier. Good Job Phil. Thanks! It may require more than the o-ring. I don't want to solder it in, but I'm not sure why this one needs a replaceable seat..... |
|


