|
|
Post by SeaRat on Sept 16, 2020 17:41:48 GMT -8
I think that being able to better control thickness with this stuff is key. I'd like to be able to make the flutter end thinner, and the other end thicker for the roll-over bit. This will require thinning the PlastiDip and dipping from both ends. Unfortunately, it might be hard to obtain Xyline, toluene, benzene, naptha, or ethylbenzene in CA. I'm looking. The PlastiDip is nasty smelling stuff. You know you're shortening your lifespan by messing with it..... It does remind me of a chocolate dipped ice cream cone, though: the most benign of all things. Okay guys, This is nasty stuff. I have just downloaded the Safety Data Sheet, SDS, which has the following hazard phrases: H-phrases from section 3: H225 H304 H315 H336 Highly flammable liquid and vapour. May be fatal if swallowed and enters airways. Causes skin irritation. May cause drowsiness or dizziness. H361D / F H373 H411 EUH066 Suspected of damaging fertility or the unborn child. May cause damage to organs through prolonged or repeated exposure - by inhalation. Toxic to aquatic life with long lasting effects. Repeated exposure may cause skin dryness or cracking. Respiratory Protection: Hand protection: Eye protection: Skin Protection Further information: In case of mist, spray or aerosol exposure, wear suitable personal respiratory protection and protective suit. Solvent-resistant gloves: rubber gloves. Break through time> 8h Please observe the instructions regarding permeability and breakthrough time which are provided by the supplier of the gloves. Also take into consideration the specific local conditions under which the product is used, such as the danger of cuts, abrasion, and the contact time. Form: Colour: Odour: Liquid Various colours. Solvents. Gutenbrunnen 39 CH-8852 Altendorf chez Tax & Consulting Sàrl. 62, Rue Jacques Mugnier FR-68200 Mulhouse Colour-Index: N.a. Safety glasses. Long sleeved clothing. Observe wearing time limits.  Screen Shot 2020-09-16 at 6.25.58 PM Screen Shot 2020-09-16 at 6.25.58 PM by John Ratliff, on Flickr ______________________________ This has the solvent, Naphta, which has less than 1% benzene (so there is some benzene, which is a cancer-causing chemical). The naphta is at 30-40% of the mixture. It also has N-Hexane, at 15-20% of the mixture. Finally there is Toluol/Toluene, at 10-15% of the mixture. So, use this only in a well-ventilated area. John (to be continued) |
|
|
|
Post by Terry on Sept 16, 2020 19:02:39 GMT -8
I think you're right Phil that controlling the dip will regulate the thickness an flexibility of the duckbill. Just as you mentioned I have also been wondering if dipping from both ends would be the way to go to have better control of what is trying to be achieved. I did a 2 dipper yesterday and overall I was satisfied with the thickness except for some minor problems with the business (flutter) end. As it dried the flutter end was nice and thin; but it appeared that some of the Plasti Dip settled at the very tip and left a thicker ridge along the end. I figured I could just trim that off and the remainder of the flattened end would be OK; but after trimming it the end wouldn't close tight and seal as I had hoped. While doing this I did notice that it still seemed to be curing even though it had been at least 5 hours since that final 2nd dip. That made me wonder if I could still do something to re-condition the end I had just trimmed, and I thought that maybe clamping it together might have some effect. I then clamped about 1/2" of the end I had trimmed into a vice and left it overnight. When I tightened the vice I made sure it was just tight enough to hold the opening together; but not too tight that it would damage the duckbill. When I checked it this morning it was definitely much better and the ends were together as I had hoped. I did have to use a scalpel blade to once again separate the end since the clamping caused it to stay together and didn't open as it should when blowing into it; but after doing that it seems to be working just fine. It's getting there but still needs some tweaking.
James that mold and dipping you did of the diaphragm look great; I think there might be some real possibilities for recreating some of these diaphragms with this dipping process.
John thanks for posting that safety data sheet. That stuff does have quite an odor to it that I noticed the moment I opened the can. I've been making sure to work with this stuff in a well ventilated area or even outdoors.
|
|
|
|
Post by james1979 on Sept 17, 2020 4:42:20 GMT -8
So, bad news first..... My laziness/impatience bit me in my rear. The Dip grabbed at every layer line on my mold, was a B@#$% to peel, and ended up tearing. Good news.... I can still vapor smooth the mold, so it will release far easier, and I validated the basic shape for it. Seems to fit just about right, and the 2 quick dips seems to be a good thickness with no fabric involved. Also, I know that can looks like hot garbage.... Ebay rescue that I haven't done any cleaning on yet.
Respectfully,
James
|
|
|
|
Post by james1979 on Sept 17, 2020 4:44:22 GMT -8
It also occurs to me, that with all our powers combined we are nearly to the point of being able to make a restoration kit for these that would take one from barn fresh to ready to dive!
|
|
|
|
Post by SeaRat on Sept 17, 2020 7:32:27 GMT -8
Okay, I have a question for you guys. Healthways, when they made the original exhaust diaphragm, impregnated the neoprene with nylon. Have you thought of doing the same, to make it more resistant to tearing?
I have the nitril glove material on two of my exhaust diaphragms, doubled, and it seems to work fine. It is not nylon-impregnated.
John
|
|
|
|
Post by Terry on Sept 17, 2020 10:41:20 GMT -8
James; taking into consideration what you said about laziness and impatience that exhaust diaphragm looks good. I wouldn't be surprised that after you make any necessary adjustments that it turns out to be just what we're looking for. I also think I'm going to give your quick double dip method a try when I attempt making another duckbill. I've made another extended / flared rubber tip to install on the end of my wood form to use in place of the one I have been using. I'm hoping this will give me a longer, thinner area I'll be able to trim to required length and still maintain proper closure at the end hopefully sealing it better. I also like your comment on the restoration kit - Great idea!  John; interesting comment you made about impregnating this Plasti Dip with a nylon material to give added strength to resist tearing. When I first discovered that Plast Dip would potentially be good for making exhaust diaphragms I had that same thought cross my mind. Great minds think alike; not bad for a couple of us senior divers.  |
|
|
|
Post by wpadiver on Sept 17, 2020 18:56:38 GMT -8
I was just using some of that PlastiDip the other day to coat a pencil for my slate and thought about duck-bills but didn't take action. I may have to try myself now to follow in your all footprints! In another life I was a paint chemist, my nose was telling me MIBK (methyl isobutyl ketone) when I was using that stuff. What I had lying around was a bit old so I did thin it a bit with MIBK, seemed to work ok.
Jim
|
|
|
|
Post by Terry on Sept 22, 2020 15:39:26 GMT -8
No I haven't given up on the duckbill; I've still been doin' some spearamintin. In fact I thought I had a winner a couple of days ago; turned out to be one of those "Close but no cigar" situations. I've been working with newer designed rubber tips that I've been attaching to the end of my wood mold. I made one that was a bit longer than the original one I have in the pictures I posted and the end is flared. That worked better than the original and allowed me to trim it to remove that bulge that settles at the bottom when I hang it to dry, and unfortunately that end is the business (flutter) end. The extended tip gives me that extra thin area that can then be trimmed and permits the ends to come together better for a better seal. Overall I'm pretty satisfied with this; but not completely. I just now made another tip that is extended like the one I just mentioned; but this one I've cut with a rounded end which gives the appearance of a duckbill and I'll be trying it next. So far I'm also thinking that no more than 2 dips need to be done, and both of these do not need to take as long as the Plasti Dip instructions recommend. The O-ring situation I've got resolved; that #019 works great and has allowed every sample I've made to properly fit within that indent of the exhalation horn. I'll keep ya posted and as soon as I think I've got a winner I'll post some pictures.  |
|
|
|
Post by SeaRat on Sept 22, 2020 16:02:36 GMT -8
Just a reminder to you folks; the duckbill for the original Healthways Scuba doesn't have to be perfect. It's only purpose is to prevent most of the water from going up into the exhaust hose when the diver is face-down, doing a surface dive, or taking a photo of some bottom creature. The exhaust diaphragm does the majority of this work.
John
|
|
|
|
Post by Terry on Oct 1, 2020 15:14:54 GMT -8
First; the bad news: Roxann & I have closed our pool for the season  so my backyard "Wet Lab" is now no longer available for testing until spring.  Now; the good news: I think that I've definitely made some headway with the duckbill project and I have one now in my reg that I'm hoping I'll be able to get over to Crystal Lake for testing. The Plasti-Dip does work and it has just been a matter of patience and testing to finally come up with something I'm finally satisfied with. I have been working with some different tips for the end of my form to give me a nice flat, thin end that will seal and do the job it's supposed to do. I think I finally have one that produces an end that is slightly longer (intentionally) than is needed so that after it is removed it can be trimmed at both ends. The business (flutter) end can be trimmed to not only size it properly; but to also end up with a nice, clean and functional end that seals as it should. The other end can be trimmed according to preference to use as a fold-over on the exhaust horn. This duckbill will also allow you to use the original wire spring retainer clip if you would like that goes inside the horn As stated I do have one that is about 95% + satisfactory installed in my reg but I am still spearamintin with the number of dips to regulate the thickness. I have been trying 1 dip based on the dip recommendations by Plasti-Dip, 1 slow dip that covers a period of about 30 seconds from the beginning of the dip until it is removed. I have also tried 1 full dip based on the Plasti-Dip recommendations, and after letting it dry doing a second quick dip that is from the bottom (flutter) end to and including the O-ring area. So far all of these methods have produced a flexible duckbill that has allowed easy installing with a fold-over and an end that closes and seals. After the duckbill is removed from the form and trimmed IT WILL NOT AT FIRST APPEAR THAT IT WILL WORK AND THAT THE FLAPS WILL SEAL; BUT THEY WILL. AFTER IT IS REMOVED AND TRIMMED IT IS IMPORTANT THAT YOU TAKE MEASURES TO "WORK" THE FLUTTER END BY FOLDING THE FLAPS INWARD TO HELP KEEP THEM FLATTENED OUT AS THEY SHOULD. GENTLY CLAMPING THIS END FOR AWHILE WILL ALSO HELP. At this point the Plasti-Dip is still curing and by "WORKING" this end as I have mentioned will help with the outcome and performance of this duckbill. Here are some pictures I have taken and I hope they will help with explaining the procedure I have done. Hopefully I'll be 100% satisfied with the outcome after a few more attempts. 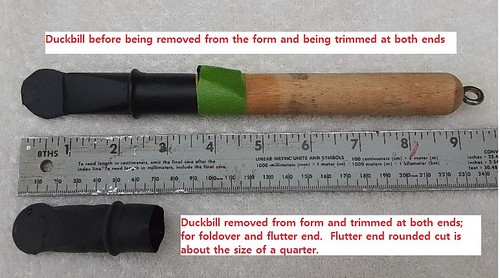 DB - A (2) DB - A (2) by Terrell (Terry) Stevens, on Flickr 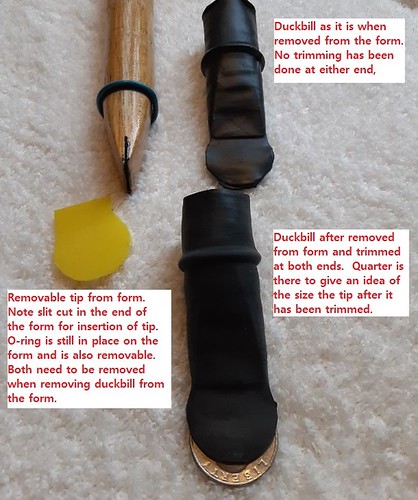 DB-B (2) DB-B (2) by Terrell (Terry) Stevens, on Flickr 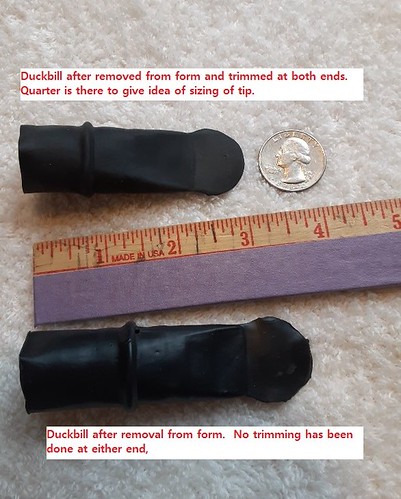 DB-C (2) DB-C (2) by Terrell (Terry) Stevens, on Flickr 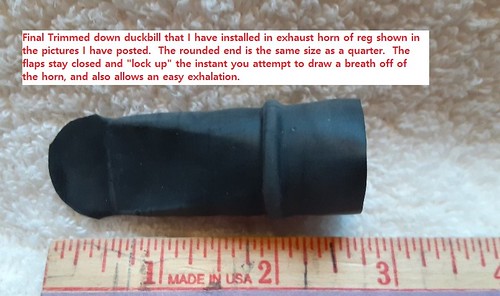 DB-D DB-D by Terrell (Terry) Stevens, on Flickr  DB-E DB-E by Terrell (Terry) Stevens, on Flickr 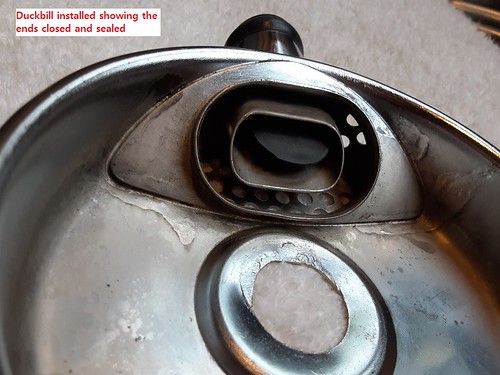 DB-F DB-F by Terrell (Terry) Stevens, on Flickr 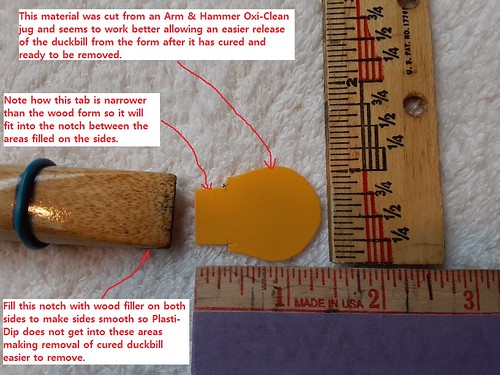 DB-G DB-G by Terrell (Terry) Stevens, on Flickr  DB-H (2) DB-H (2) by Terrell (Terry) Stevens, on Flickr |
|
|
|
Post by vance on Oct 1, 2020 16:39:12 GMT -8
I like this. I'm impressed with the groove and the fold-over double trouble! I had pretty much given up on plastidip, thinking it is probably great for its intended use, but not so much for duckbills. I'm glad you've stuck it out, Terry! Good work! I hope this works and you can let us go to school on you!
|
|
|
|
Post by james1979 on Oct 1, 2020 18:03:59 GMT -8
That looks incredible Terry! Now I have to get back to the diaphragm mold, so I'll have something to trade you for one!
Respectfully,
James
|
|
|
|
Post by Terry on Oct 4, 2020 14:58:16 GMT -8
Definitely making some headway and hopefully in the next few days I'll be getting some sample duckbills out to you guys who will be testing them. Some observations made this past week: Dipping - I have been doing just 1 full dip as recommended by Plasti-Dip and for the most part that seems to have been working just fine. If I have noticed an area where I didn't feel it was covered as well as I would have liked I have discovered that using a Q-tip you can just dab that area with Plast-Dip and that works just fine. It turns out that it adheres just as if you had done another dip. This stuff is strong and so far I have not had any issues with it tearing or puncturing when I've been handling it. I have also tried another dip procedure by doing 1 full dip and then after drying doing a 2nd dip that covers the area from the bottom flutter area up to and including the O-ring area, and that also seems to work just fine. This method seems to beef-up the flutter area and leave the upper area thinner and more flexible for stretching to do a fold-over on the exhaust horn. Tips - I have made different tips from plastic, rubber, whatever from different soap, bleach jugs, butter container lids and have found that they do not all work the same. Some have better release characteristics than others when it comes to removing the cured duckbill from the form/mold. I have also made a tip from some thin aluminum and that worked from a release standpoint; BUT it had somewhat of a tendency to cut the sides of the tip of the duckbill when trying to remove it; not always but just enough to be a PITA. I did discover that these cuts could also be repaired with the same dabbing method I mentioned above. One thing that did work really good with any of these tips was to spray the form/mold with silicone before dipping. I only sprayed from the bottom to the O-ring area and that seemed to be sufficient. O-rings - I found that after a number of dips that it helps to change these since they begin to not release as well and you have to work a bit harder to roll the duckbill to get it beyond the O-ring so you can finally get it far enough down so you can remove the tip. Anyway; for any of you who may be attempting to make any of these; I hope by passing on the lessons I've learned that it will be of help to some of you, AND women and children will be allowed to be in the same room with you then by eliminating some of the problems. Now; where's my Tylenol??  |
|
|
|
Post by vance on Oct 4, 2020 15:41:19 GMT -8
I was concerned, but did not test, that by using some kind of release agent on the mold, coverage would be a problem due to thinning. Sounds like that is not the case?
My suggestion for the shape of the DB is that the volume should as large as possible, that the end of the DB extends as far across as it can for as much air to pass through as possible, and as far toward the exhaust diaphragm as possible w/o touching. The exhalation pressure should bow the diaphragm outward into the box, away from the intake tube seal. If it is too far back, it won't interact as it should.
Exhalation effort is now the biggest problem since many iterations of the SJ have improved inhalation effort by quite a bit, and new ones will improve it a lot more soon!
|
|
|
|
Post by Terry on Oct 7, 2020 8:14:15 GMT -8
After reading the comments Phil made in regards to the size and shape of the duckbill it occurred to me that I should probably clarify to some degree what I have done and why; especially for those of you who are receiving test samples that will need to be properly trimmed before installation and use. I fully agree with the comment that the duckbill be as wide and cover as much area as possible to allow ease of exhalation and for it to function properly. For this reason that is why I kept working with different shapes and sizes of removable tips to be installed on the wood form/mold. The tip that I finally decided worked the best is in fact longer than it needs to be and it was designed that way intentionally. First of all it's wide enough to fill the area where it's installed and provides enough flutter area for easy exhalation when trimmed properly and it's long enough to provide waste material at the end to be trimmed off. This extra length was intentional so that after being trimmed this still leaves enough flat area that can come together for proper sealing. As it is when this duckbill is first removed from the form/mold IT IS TOO LONG AND WILL NOT PROPERLY FIT SO TRIMMING IS A NECESSITY. If not trimmed when the duckbill is installed with the molded ridge properly in place within the indent in the horn the flutter end will be pushing against the exhaust diaphragm, and the other end is too long to allow an easy fold-over. All of this will be very obvious when doing the initial trial fittings before any trimming. When trimming; I did a little at a time so that I would clear the end sufficiently so that it was not pushing against the exhaust diaphragm; but not too much so that the flat areas did not come together and properly seal. After the trimming is complete you might have to re-work these ends to get them to lay flat together as they should, and they will (well at least mine has). Hopefully this explains a few things and will make this process an easier and successful one for anyone attempting to make one of these. Good luck everyone! Here's a picture with some notes that I hope will clarify my explanation.  Trimming of the duckbill (2) Trimming of the duckbill (2) by Terrell (Terry) Stevens, on Flickr |
|


 so my backyard "Wet Lab" is now no longer available for testing until spring.

