|
|
Post by vance on Jul 29, 2020 15:32:16 GMT -8
This is pretty amazing. I get to sound off about a replacement part, or an idea for a mod (3D printed GL wagon wheels, a new DivAir cover, a semi-flexible exhaust diaphragm retainer, a Scuba air director, a 2 piece replacement case ring, a spacer bell, etc.) and they get made!
Bah-lah-yam! Done! Thanks, James!
|
|
|
|
Post by james1979 on Jul 29, 2020 15:55:27 GMT -8
This is pretty amazing. I get to sound off about a replacement part, or an idea for a mod (3D printed GL wagon wheels, a new DivAir cover, a semi-flexible exhaust diaphragm retainer, a Scuba air director, a 2 piece replacement case ring, a spacer bell, etc.) and they get made! Bah-lah-yam! Done! Thanks, James! What can I say... I enjoy solving problems! Also... I've gleaned so much info off here, VDH, and SB that I figure stuff like this is just paying back for all the help I've received from the boards.
The workshop is still open... rules are always that I'll take a swing, no promises that I won't miss! lol
|
|
|
|
Post by nikeajax on Jul 31, 2020 10:42:34 GMT -8
So, I see that James and PY have made this with an adjustable... vent, port? How big/what size of, gap/hole should there be? Should I glue/RTV it in?  Thanks guys  JB |
|
|
|
Post by SeaRat on Jul 31, 2020 12:50:26 GMT -8
Sweeeeet! That is awesome! It's much too pretty for that ol' Scuba. I'm mailing you the bit of silicone DB material for the holes on the inside with the clamp. But, if you use a DB, you don't need the rubber band, really. If you're cutting down a USD repro DB, just cut a 3/8" band off the end! Actually, if you don't close off those holes on the exhaust tube, you might as well just soldier shut the exhaust horn area, as you've made the exhaust diaphragm unnecessary. These were meant to be a third, redundant system for the exhaust in case the exhaust diaphragm itself was stuck to the horn opening. Some early Healthepwys Scuba regulators don't Evan have those holes. Now, how did I miss seeing that neat replacement box clamp at the bottom to the last page? John |
|
|
|
Post by james1979 on Jul 31, 2020 16:57:32 GMT -8
So, I see that James and PY have made this with an adjustable... vent, port? How big/what size of, gap/hole should there be? Should I glue/RTV it in? Thanks guys JB Well, Phil tried out that version, and came to the conclusion that it is to thin (flexes to much, allowing blow-by) and is better than nothing, but not as good as your original folded metal design. I'm working on version 0.6 (what I sent you is v0.5.3), which seems to me to be much better (but doesn't have an adjustment). I'll send one to Phil for comparison testing... and if I get one to where the venturi is too much, I'll add in an adjustable vent again. Meantime, feel free to use that one (I'd recommend full closed on the vent), and I'll send you a new one when it's dialed in better.
And the intent is to not need sealant, or any modification to the reg... other than a small adjustment to lever height due to the whole lever assembly sitting higher.
Respectfully,
James
|
|
|
|
Post by nikeajax on Jul 31, 2020 17:08:05 GMT -8
I read you five by five on that, over...  JB |
|
|
|
Post by Terry on Aug 6, 2020 15:06:50 GMT -8
When the mailman came today I was glad to see the package from James I've been waiting for. I ordered a couple of the exhaust diaphragm retainers from James and was really impressed when I opened the package. They look great and the appearance of their construction appears to me to be very substantial and when used with the S/S band clamp designed by Phil will perform the job of securing a diaphragm much more effectively than the original setup that Healthways used. At the moment my Healthways Scuba has it's original exhaust diaphragm and wire clamp installed; but hopefully in the near future I'll remove them and give these new retainers along with the S/S band clamp a try probably with some nitrile and whatever else looks like it might work. I'm real curious to see how the curved retainer works in regards to holding the diaphragm tight against the exhaust tube. Overall I think this is a much better approach to this issue than the way it was originally designed. Thanks James and to everyone else for all there efforts in regards to this matter. |
|
|
|
Post by vance on Aug 16, 2020 14:43:04 GMT -8
I did a pool test on the Super Scuba and the Super Deluxe today. Took them down to a dizzying 8 fow.
Mixed results:
The Deluxe needs a larger (or another) hole drilled into the cover to throttle back the venturi action a bit. Too much. It feels ok until you demand a bit more than a normal relaxed breath, and it pushes a big burst of air at you. It feels on the cusp of an out-of-control freeflow.
The Scuba (with the SJ v0.6 and 3D print exhaust diaphragm retainer and theraband diaphragm) actually did better than I anticipated. It felt pretty good, seemed to deliver adequate air, and I was pleasantly surprised at the exhale effort even with a duckbill.
I also tested the Mistral/Titan II, and the DivAir rescue puppy. The Titan II blew the second stage wide open, scaring the B-Gziz out of everyone lounging poolside, but the DivAir did great. I checked the Titan II later to find the IP at 200. I've had problems with this one before, and I suspect the HP seat is crap.
I think I also figured out why the Trieste has a double bend in the lever. More on that elsewhere.
|
|
|
|
Post by nikeajax on Aug 16, 2020 15:39:59 GMT -8
Good to know my friend! James sent me a couple of the ones y'all did for the Scuba-A. I bought some stainless especially to make a SJ for my Deluxe: it sounds like the one I sent you gets pretty high marks, even still! That feels pretty good Is the Titan seat an OEM Voit, if that is the case, that is good to know! JB |
|
|
|
Post by Terry on Sept 12, 2020 16:46:12 GMT -8
Finally got back to the issues with the exhaust on my Healthways Scuba; this time in regards to the duckbill valve and I think I might be on to something - hopefully! As Mark (Scubalawyer) would say; I been doin some spearaminten. I recall reading a post some time ago in regards to the duckbill valve and it had to do with making a mold from broomstick material. I believe it was Phil; but if not I stand corrected. Anyway I decided to make a mold from broomstick and to cast a new flutter valve using Plasti Dip, and so far I've been really impressed with this stuff. It's a liquid rubber and it is some really tough stuff which so far has me convinced that it would definitely hold up for the job. Here's a rundown on what I did and materials I used. *** I obtained an 8 inch piece of broomstick to be sanded and shaped as an inner mold to cast a new flutter valve by dipping into Plasti Dip. *** I marked the end of the broomstick with center marks from side to side and up and down. I then measured back from the end about 1-1/2"; the area where I would begin the taper to make this mold similar to the shape of my original flutter. I achieved this by using a wood file and sanding with my oscillating tool. I finished the sanding with real fine paper and steel wool to leave a real smooth surface. *** Before I began the shaping of this mold I cut a notch about 3/8" deep along one of the center lines that I made mention of above. This notch is for the piece of thin rubber material I inserted after the mold was shaped; which gives an extended thin area at the end of the shaped part of the mold. This is the area of the valve that flutters with the exhaled air, and depending on how long you make it; it can be trimmed as needed when the new valve is made and removed from the mold. *** After the new mold was shaped, rubber end inserted and all of the final sanding was done I dipped the mold into a can of polyurethane about 6" twice. After it was dipped and thoroughly dry I lightly sanded it with some fine steel wool both times. The reason for this was to leave a surface that would easily release the new rubber duckbill after it has cured. *** I then slid the O-ring on the mold determining it's location by holding my original duckbill next to it using it as a guide for location. DO NOT GLUE THIS IN PLACE. IT ALSO NEEDS TO BE REMOVED WHEN REMOVING THE NEWLY FORMED DUCKBILL. *** Get out your Plasti Dip, read the instructions and begin dipping your mold to create a new duckbill NOTES AFTER MY FIRST ATTEMPT: The first one I made consisted of dipping the mold 6 times which obviously creates 6 layers for this duckbill. That was too thick and I believe that 4 or 5 dips will probably work much better. However the thickness that I achieved by dipping 6 times appears to create a thickness that would be suitable for dipping an exhaust diaphragm. Just an afterthought. The O-ring that I used was a #118 and that I thought was too thick. It created an area too thick to properly fit within the indentation of the exhalation horn. I plan on using a #019 the next time which I think will work much better. When removing the cast flutter valve from the mold all I can say is that IT WILL COME OFF; however PATIENCE, PATIENCE,PATIENCE. Alcohol and incantations may also be required; BUT IT WILL COME OFF. Begin at the round end by rolling it back on itself towards the tapered end. At the tapered end I also made a slit in the end so I could VERY CAREFULLY slide a pocket knife inside to loosen the duckbill from the mold to allow for easy removal when you have finally rolled the other end down far enough to remove the O-ring. From this point mine slid right off. If you give this a try; good luck and have some fun with it. Here's some pics that I hope will help. 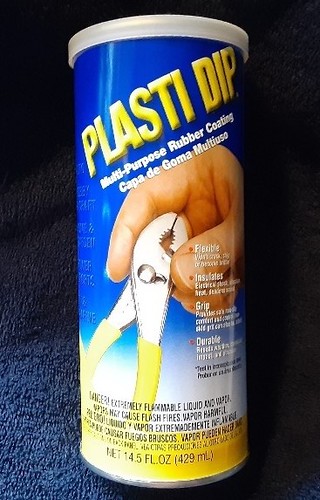 Duckbill 4 (2) Duckbill 4 (2) by Terrell (Terry) Stevens, on Flickr  Duckbill 3 (2) Duckbill 3 (2) by Terrell (Terry) Stevens, on Flickr  Duckbill 2 (2) Duckbill 2 (2) by Terrell (Terry) Stevens, on Flickr 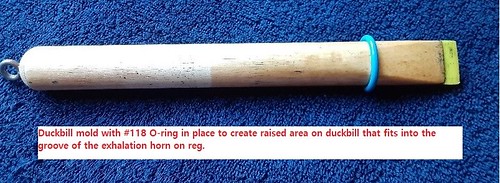 Duckbill 1 (2) Duckbill 1 (2) by Terrell (Terry) Stevens, on Flickr  Duckbill 5 (2) Duckbill 5 (2) by Terrell (Terry) Stevens, on Flickr  Duckbill 6 (2) Duckbill 6 (2) by Terrell (Terry) Stevens, on Flickr 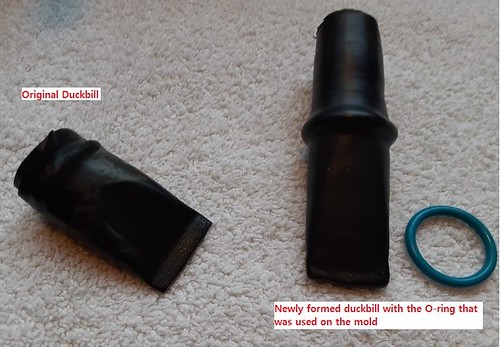 Duckbill 8 (2) Duckbill 8 (2) by Terrell (Terry) Stevens, on Flickr |
|
|
|
Post by vance on Sept 12, 2020 19:04:21 GMT -8
That looks very good! I was the one who did the dipped (acutaully brushed) silicone over a dowel form. The silicone remains drippy too long, and creates problems with evenness. It gets thick or thin in places. I set up a motor from my rotisserie to try to get the stuff to set more evenly by continually revolving, but it never worked that well. I will try this method out!
|
|
|
|
Post by Terry on Sept 12, 2020 19:28:45 GMT -8
|
|
|
|
Post by vance on Sept 14, 2020 13:36:40 GMT -8
I got some plastidip at HomeDepot and started 'spearmintin' as well. I made a too complicated, flattened at one end copper pipe form with a piece of copper sheet soldered in the end to make the flutterin' place. I tried to make it the same shape as the original, which has a flare out at the flutter end.
I got so involved in making it the same shape as the OEM valve that I neglected to consider how I'm going to get the @#$%^!! off the form. Oh, well, one more dip (for a total of three) and I'll see if it can be done. Maybe blowing some compressed air as I try to wrangle a thingy underneath?
My dipped silicone valves were thicker than necessary. I'm going to take Terry's suggestion of only 3 dips. If that works, maybe 2 dips? I'd love to see this work. It definitely has legs.
Terry's idea that this material might make a decent OEM style exhaust diaphragm also has merit. Some thinking would need to be done on how a mold could be made...
|
|
|
|
Post by james1979 on Sept 14, 2020 14:57:30 GMT -8
Terry's idea that this material might make a decent OEM style exhaust diaphragm also has merit. Some thinking would need to be done on how a mold could be made... I could take a crack at modeling, and printing a mold. If I vapor smooth it I should be able to get a glass smooth surface. Then send to you for spear-mintin...
just a thought
|
|
|
|
Post by vance on Sept 14, 2020 15:35:51 GMT -8
Terry's idea that this material might make a decent OEM style exhaust diaphragm also has merit. Some thinking would need to be done on how a mold could be made... I could take a crack at modeling, and printing a mold. If I vapor smooth it I should be able to get a glass smooth surface. Then send to you for spear-mintin...
just a thought
Oh, yeah. Let's give it a whack. Although, I think the rubber sheet/3D retainer/new clamp has got it. Who says oem is better? |
|


