|
|
Post by JES on Dec 8, 2005 19:46:29 GMT -8
It puts the neoprene in the basket! Sorry, a little Silence of the Lambs joke, for those who have no idea what I just said.  |
|
mudhog
Regular Diver

Posts: 18
|
Post by mudhog on Dec 17, 2005 10:21:04 GMT -8
Hey Luis..... From the checking I can do at this end it appears the Conshelf yoke uses a 13/16" 20NEF (National Extra Fine)thread, at least it conforms to the dimensions of the blueprint you sent me. Just hope its not a metric thread as my lathe won't cut most of them.  I get into this proablem often enough that I have both english and metric thread gages. PS, would have emailed but I didn't save your home addy and doublehose is down. Mudhog |
|
|
|
Post by luis on Mar 3, 2006 9:27:14 GMT -8
Well, I have the machined prototype RAM 1st stage body in front of me.  It looks great. There is one small mistake in the length of the yoke threads that is easily corrected. I will be checking it in more detail this weekend and hope to test it next week. I will be posting pictures within the next couple of days. |
|
|
|
Post by luis on Mar 3, 2006 19:02:13 GMT -8
|
|
|
|
Post by treasureman on Mar 5, 2006 17:20:13 GMT -8
These look extra cool. finaly I can use my pressure guage without adapters
|
|
|
|
Post by treasureman on Mar 5, 2006 17:20:40 GMT -8
These look extra cool. finaly I can use my pressure guage without adapters
|
|
|
|
Post by seakrakken on Mar 5, 2006 23:33:50 GMT -8
Luis, When do you think you will be able to start taking orders? and what will the price be?
|
|
|
|
Post by luis on Mar 6, 2006 7:18:10 GMT -8
Luis, When do you think you will be able to start taking orders? and what will the price be? I may take orders soon, but I probably won't be able to deliver any of them before Sand Dog III. I will see what I can do. I will know more about the price / cost in a few days. The machine shop needs to look at the hours they spent. The programing is done, but I will be making a couple of changes for production. I should have a lot more to post in a few days. |
|
|
|
Post by luis on Mar 6, 2006 19:15:31 GMT -8
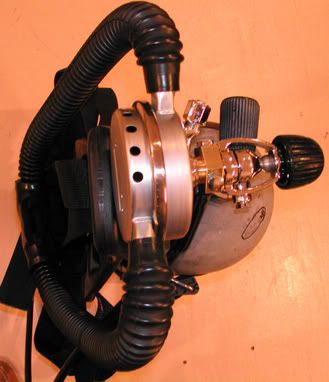
Last night I put together the new nozzle and all the working components of the first and second stage. At first it was working great. First impressions is that the flow rates are the same as the original Royal nozzle. The force required to open the first stage valve (pushing on the mushroom pin holder) is about 8 Lbs; with or with out tank pressure (no surprise there). I installed the first stage into the main body with a rebuilt second stage and a IP gauge attached to the hookah port adapter. I was not measuring air flow, but just activating the second stage by hand and the IP drop seemed consistent with the characteristics other Royal AM. As I was starting to feel great about it, an IP leak developed from the first stage. It was leaking around the O-ring that seals the removable volcano orifice to the body. For testing purpose I stopped the leak by using a bigger diameter O-ring. When I was assembling it the first time, I could tell that the compression on the O-ring was not adequate. I consulted with the Parker O-ring manual but pushed the limits to cut cost in the prototype and I lost in my gamble. In production I will have to make it tighter (this is not a problem). Making it tighter will require a slope O-ring ramp at the bore diameter change. The cost adder should be minimal in production. Tonight I reassembled it with the fatter O-ring and it is working great! I have only measured the IP wile trying to pull as much suction as I can and the maximum instantaneous pressure drop is about 6 psi. I normally run my IP on my Royals at around 145 psi. This one seems to be performing as good as my other 2 Royals. The IP is also holding for over an hour without drifting at all. I will be posting more information in the next couple of days. See the pictures below. 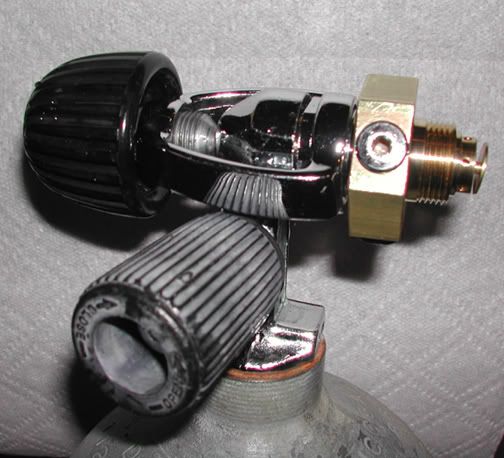 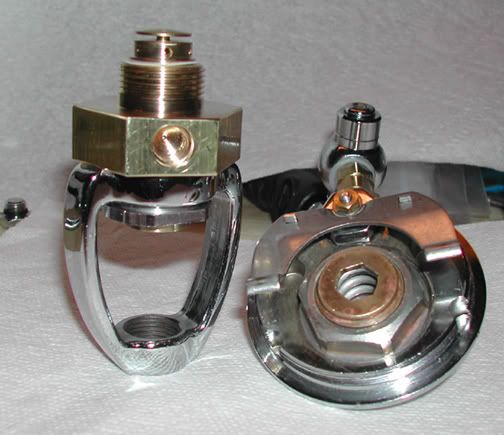 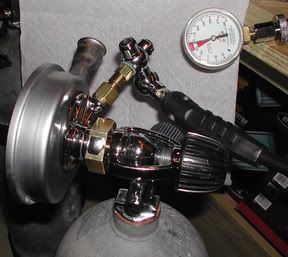 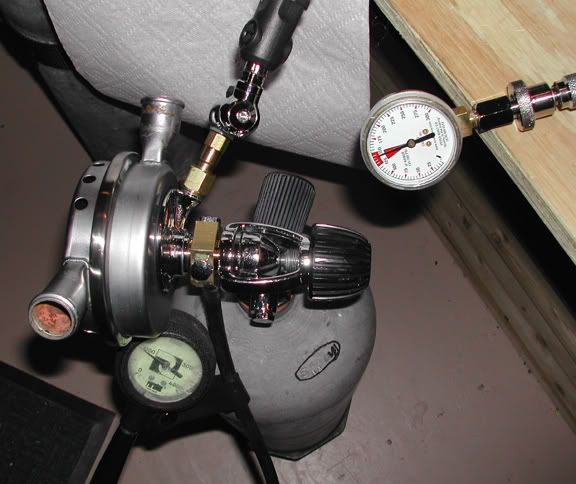 |
|
|
|
Post by treasureman on Mar 7, 2006 10:58:21 GMT -8
will the hp orifices be threaded for new pressure guages or the old style??
|
|
|
|
Post by luis on Mar 14, 2006 3:06:46 GMT -8
will the hp orifices be threaded for new pressure guages or the old style?? The high pressure ports will be 3/8" - 24 tpi threads. The old standard. |
|
|
|
Post by luis on Mar 14, 2006 3:08:58 GMT -8
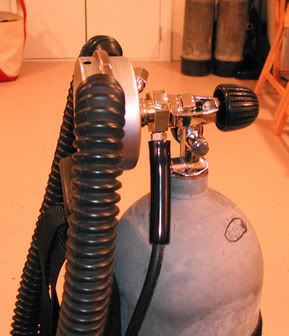
I went diving last Saturday with the prototype Royal Aqua Master with the new first stage. It worked great. It was nice putting the regulator on the tank without the banjo. Don’t take me wrong I think the banjos are great and I will continue to use one with my round label Royal, but it was nice not needing it. During the second dive a fourth diver was joining us. He was having a free flow on his inflator / octopus caused by his first stage. I offered for him to borrow my spare single hose regulator (an early 70’s Scubapro Mk-5). He was impressed with the condition and performance of my vintage single hose regulator and then made a comment that some day he would want to try a Royal Aqua Master. He didn’t know that not only I was diving one, but I had another one in the car. Well, to make a long story short, he used the prototype Royal Aqua Master. It worked well with his high pressure 120 cu ft tank. He liked the performance of the prototype Royal AM. I forgot to mention to him that he was diving an experimental regulator. I dove my round label Royal with a banjo for the second dive. Here is a shot with the pressure gauge hose coming out of the first stage.  The water temperature was 38F. One of those hoses on the picture below goes to my drysuit. 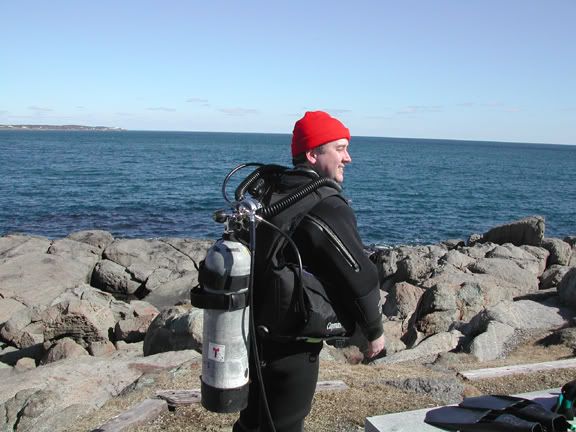 The entrance to the water was a bit to the right of this picture. It was mid-tide, making it one of the roughest entrance I have had in long wile. 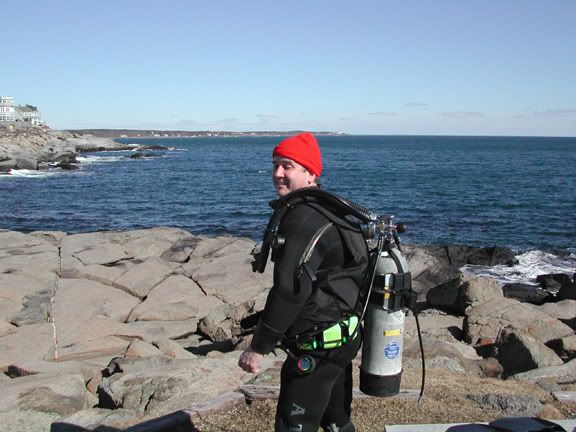 |
|
|
|
Post by luis on Mar 14, 2006 3:10:39 GMT -8
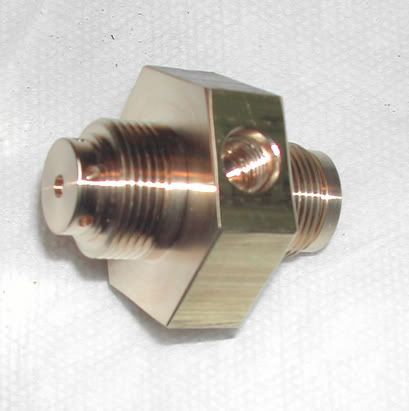
I am sorry how long this project has taken, but now that I have a working prototype, the drawing below shows the nozzle I actually want to make. I moved the mechanism out towards the tank valve in order to tap into the low and high pressure air by drilling at an angle above and below the volcano orifice. My plan is to have two high pressure ports and four low pressure ports. The longer pin is going to work fine with a Titan mushroom pin support. The Titan pin doesn’t have the head of the Conshelf pin. The length of the pin is structurally fine (elastic instability / buckling is not an issue). The machine shop said they can do the new revision first stage body / nozzle at a reasonable price. I have to clean up the drawing and show a couple of more sections specifying which ports are low pressure and which are high pressure. Before any one ask; I asked the machine shop about the cost of making different size ports and he didn’t want to do it at the price we might be getting. At this point it looks at about $150 or less with enough margin for me to recover what I have into this project. What do you all think? 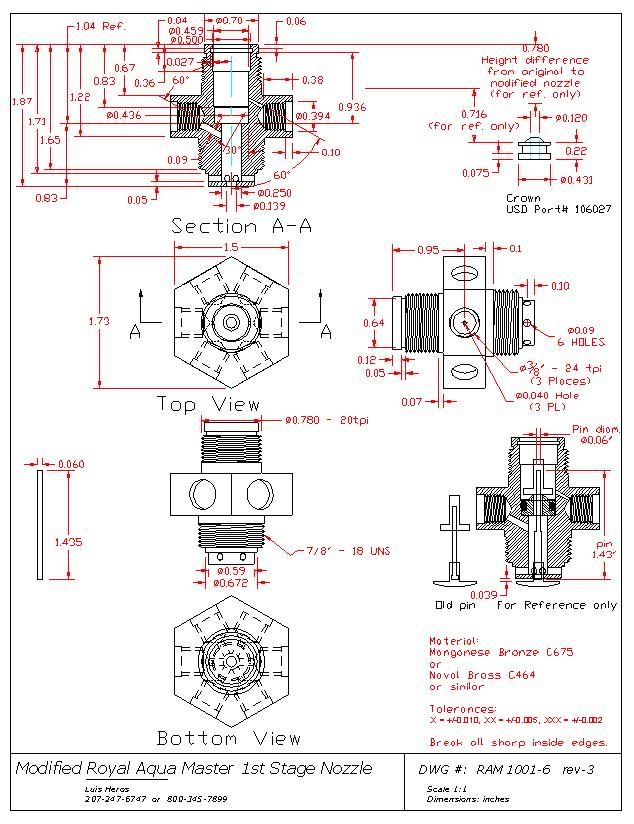 There is only one last concern: liability. The design of this first stage has been around for almost 40 years, but I am changing the packaging a little bit. I need to look more into this. |
|
|
|
Post by luis on Mar 14, 2006 3:13:16 GMT -8
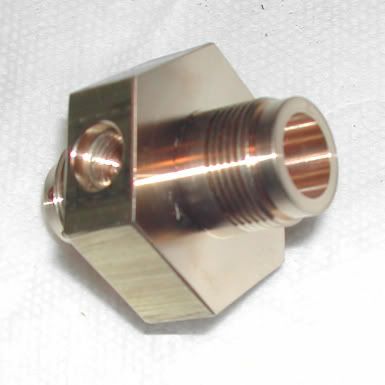
Here are some more action pictures of the prototype. Notice the high pressure 120 cu ft tank my friend was using. The heavy Conshelf yoke works great.   I should point out that the LP ports will be adequate for the BC inflator and a drysuit inflator, but it may not provide enough flow rate for an octopus. The drilled opening size between the port and the LP cavity is restricted because of the angle that they have to be drilled at. I wanted to do some air flow calculation before I brought it up (so I had a better idea of how much of an issue it may be) , but the bottom line is that I can’t really do much about the opening size. Air flow calculations are not a precise science, so the final word will come from testing anyway. I am still planning on doing some air flow calculations when I get a chance. The worst case would be that we may still need to use the hookah port for the octopus. I don’t know about everyone opinion, but to me getting rid of the swivel T and the swivel 90’s would be a huge improvement; even if I still have to use a hookah adapter for the octopus. |
|
|
|
Post by luis on Mar 14, 2006 3:14:50 GMT -8
Here is a shot of my good old Royal Aqua Master in action, with all the LP plumbing. It works, but it is not the most elegant design. That is a nice regulator. ;D  |
|


 I get into this proablem often enough that I have both english and metric thread gages.
 It looks great.