|
|
Post by tomcatpc on Aug 1, 2016 19:53:46 GMT -8
This is really turning out into a great resource.
Mark
|
|
|
|
Post by nikeajax on Aug 2, 2016 11:18:22 GMT -8
I noticed something about this image, it shows the Deluxe... but then look at the yoke! 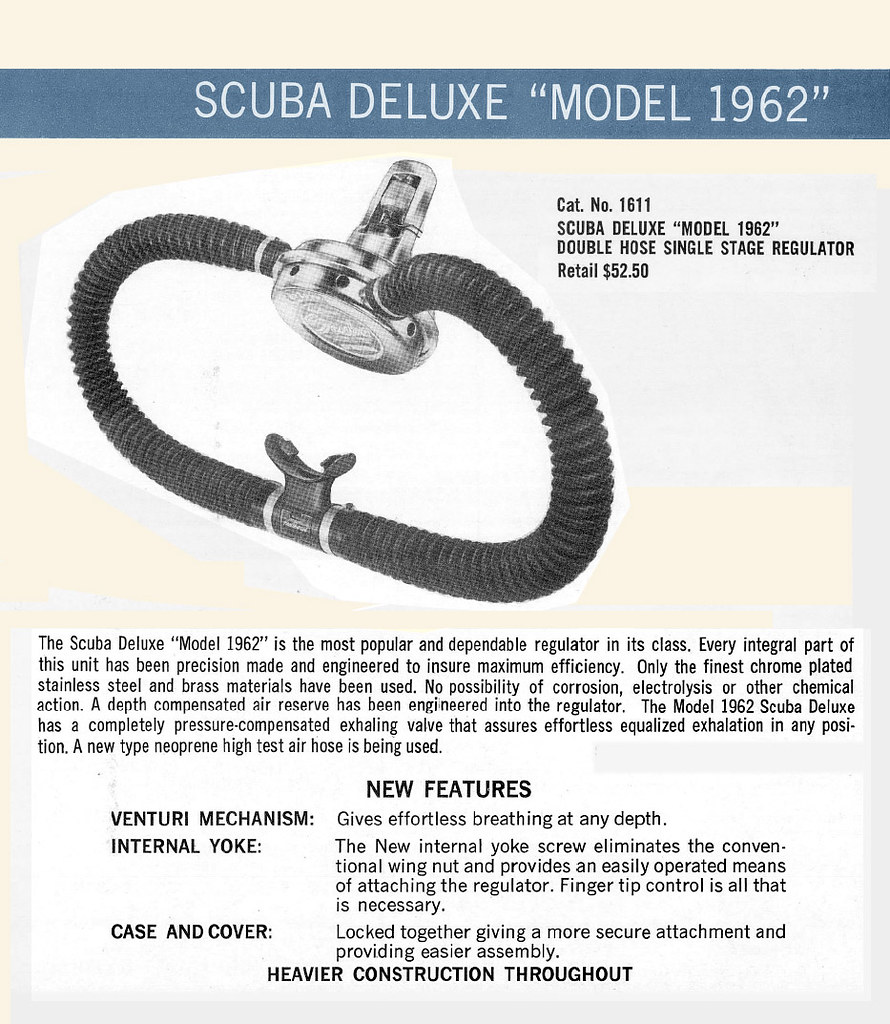 Things to come... JB |
|
|
|
Post by nikeajax on Aug 2, 2016 13:24:33 GMT -8
The final chapter in Healthways double hose regulators was also called the "Scuba" 1963-1967: 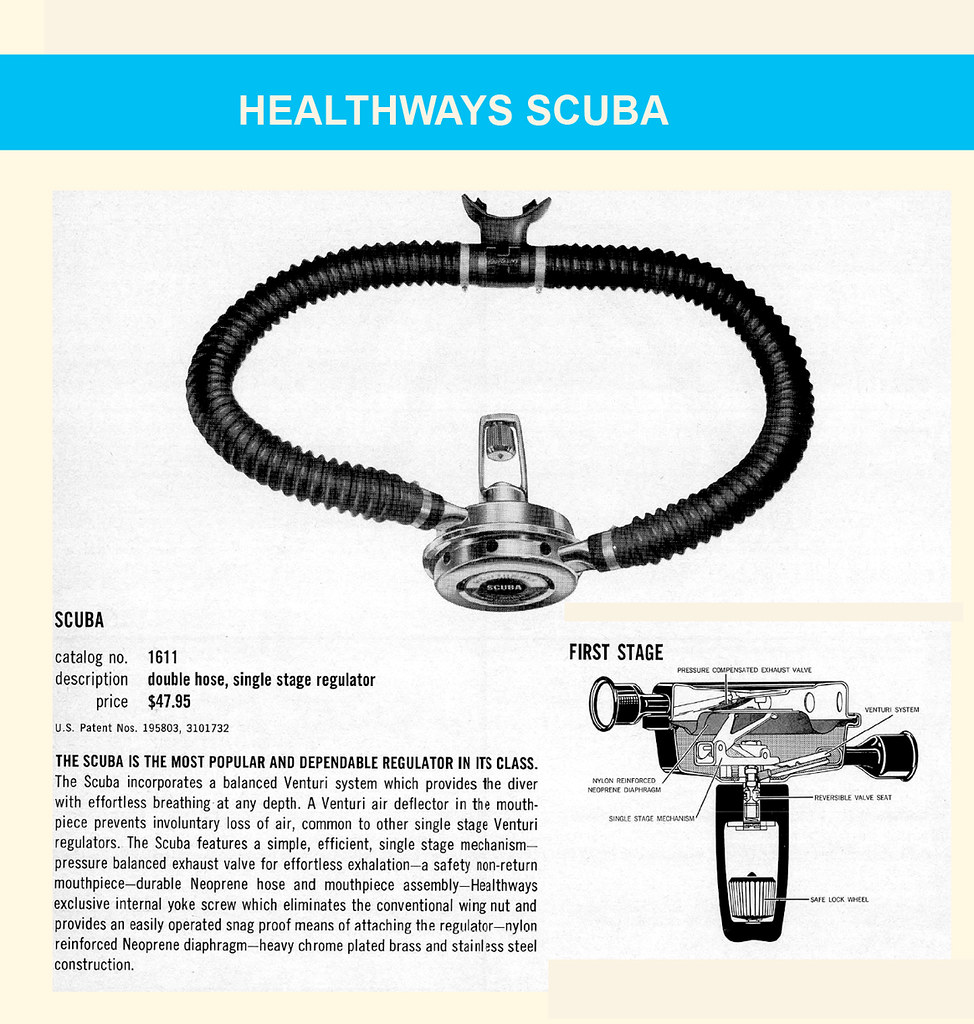 The real departure from previous Scubas is the use of a very effective and powerful venturi: here are the individual parts broken down: 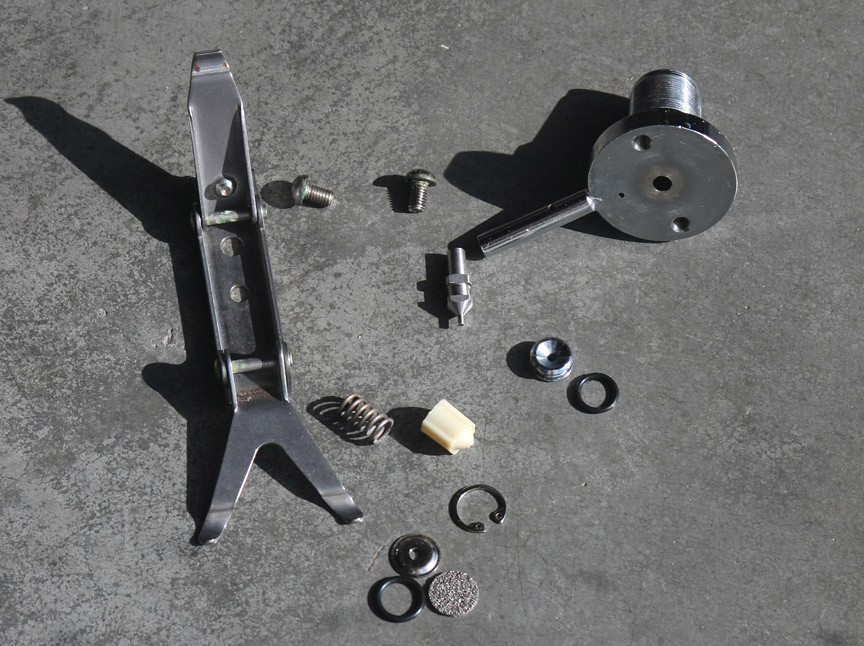 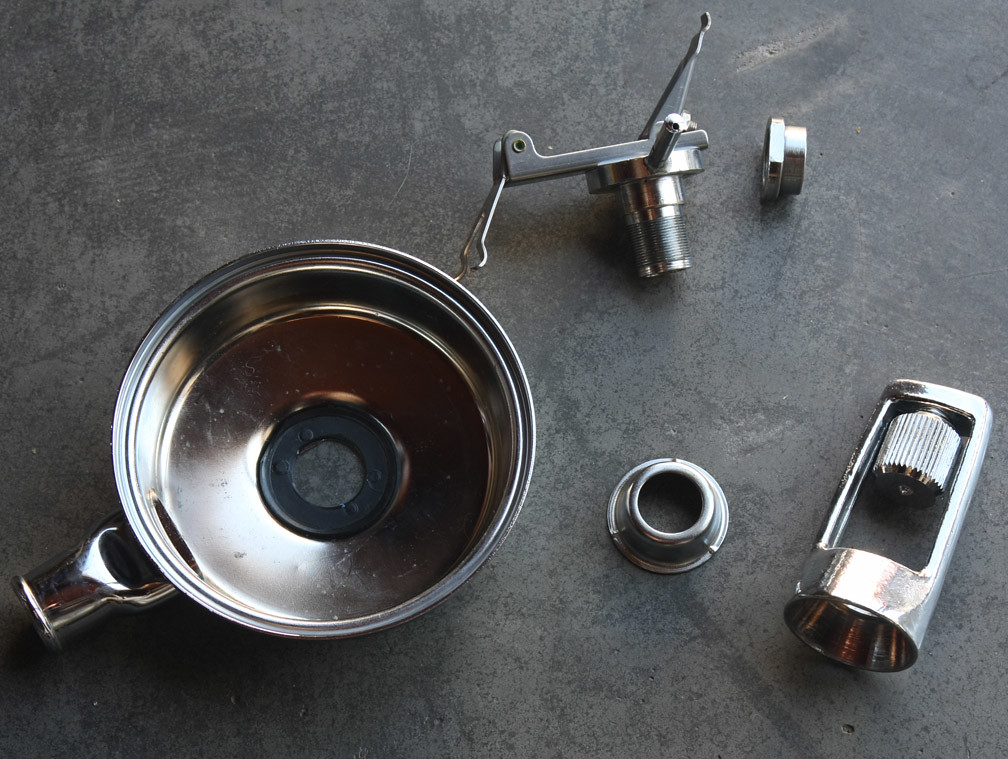 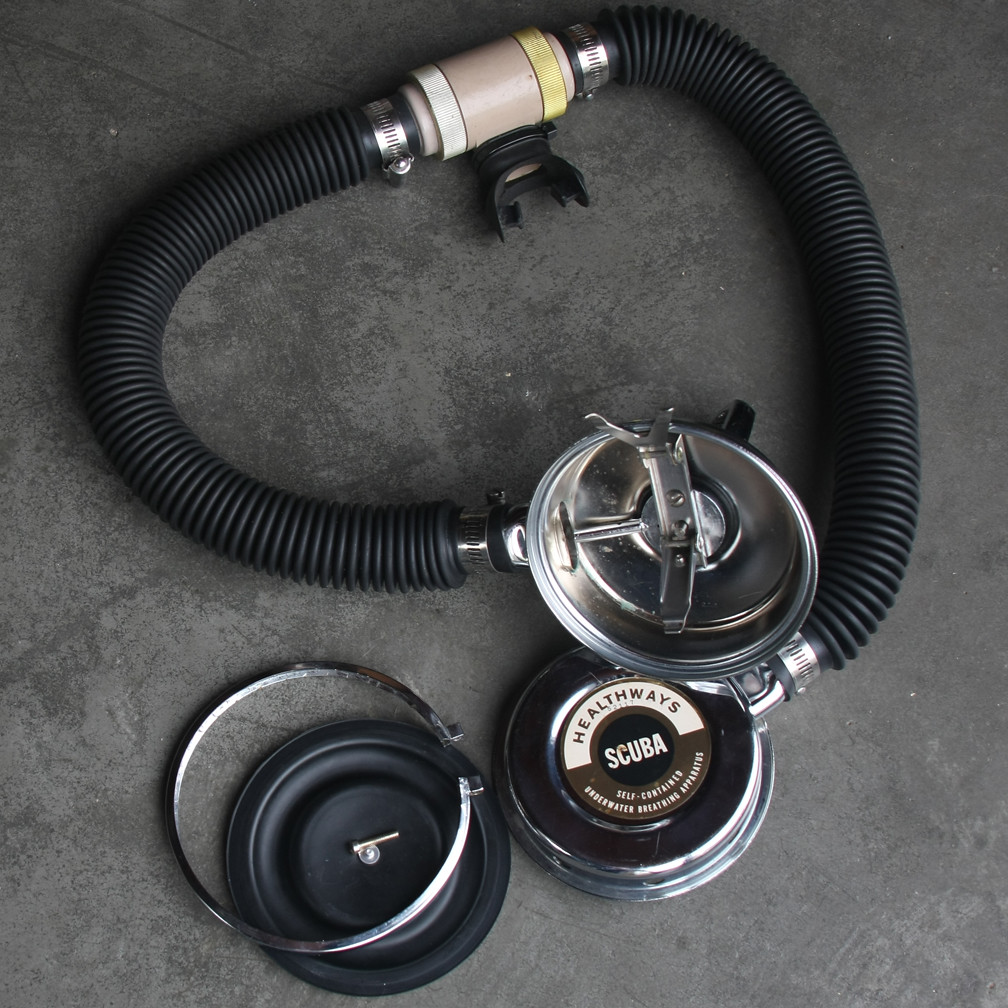 Most collectors refer to this reg as a "Gold Label" or "Goldie" to avoid any confusion with all previous Scubas. Some of the styling is similar to that of their other top-of-the-line regulator, the Scubair-300: 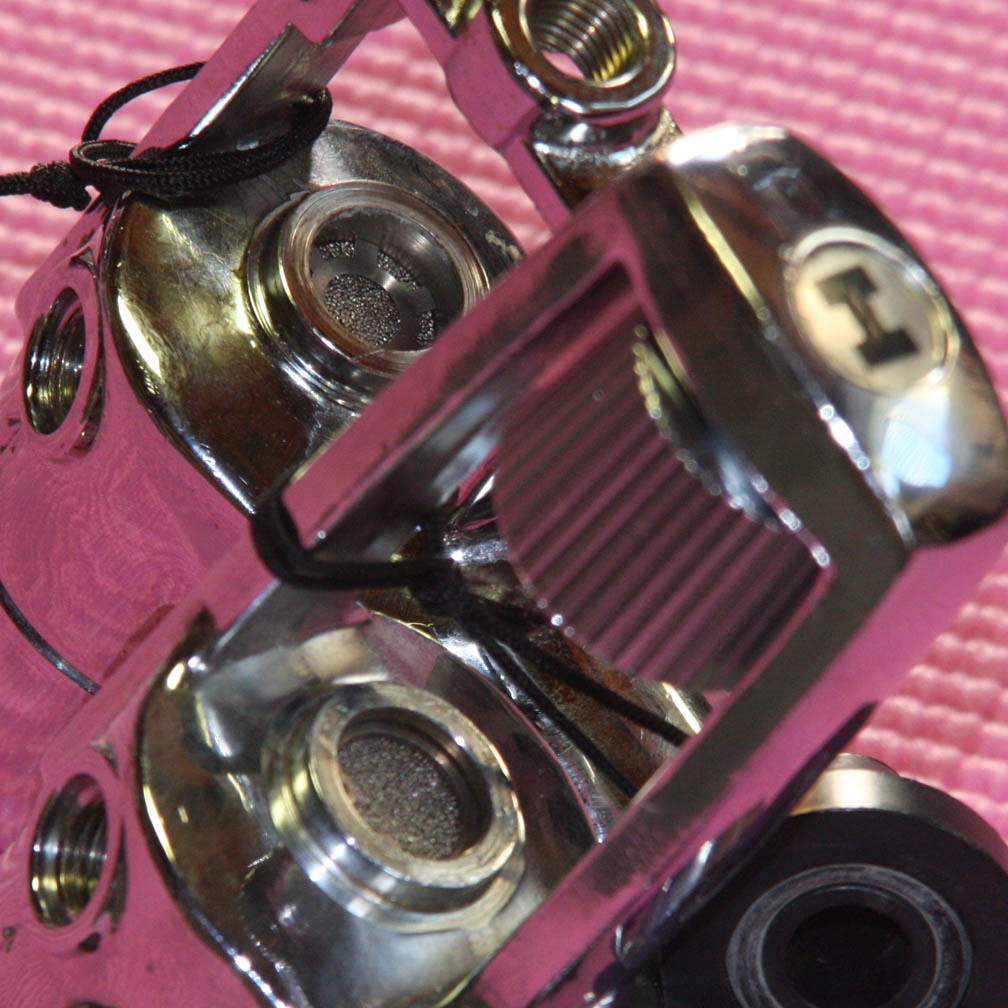 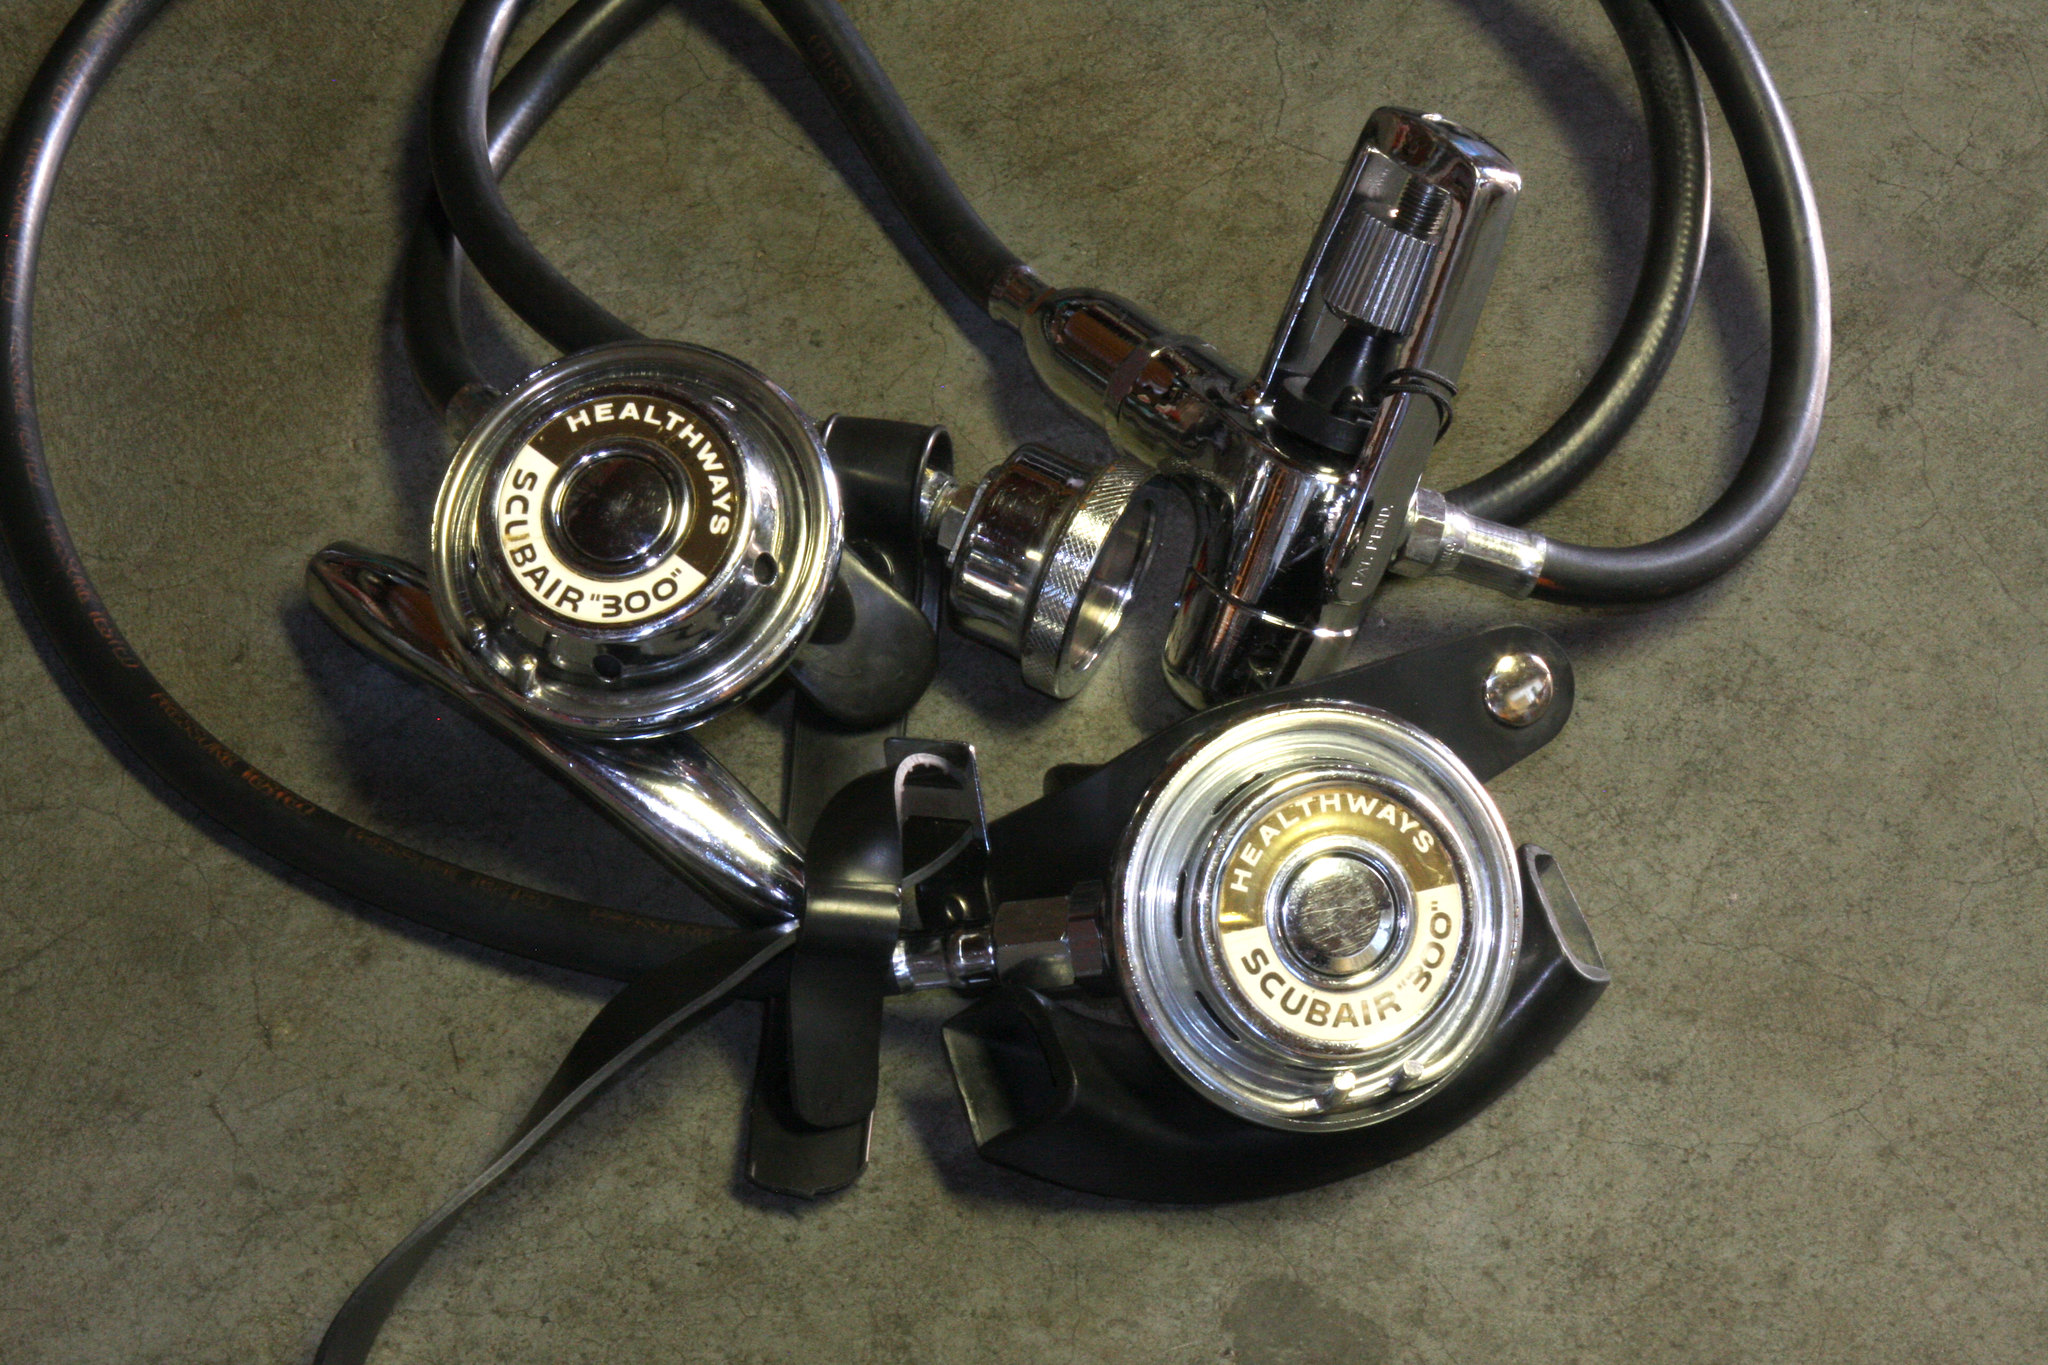 JB |
|
|
|
Post by SeaRat on Aug 2, 2016 13:25:49 GMT -8
Jaybird, it is the Gold label, before the new gold label.
John
|
|
|
|
Post by nikeajax on Aug 2, 2016 13:29:14 GMT -8
John, I'd bet they're hard to come by too, not that you couldn't make your own, but finding one that wasn't made to be a "1962" would be a fun oddity to find, eh?
JB
|
|
|
|
Post by nikeajax on Aug 8, 2016 12:56:04 GMT -8
Now that we have all of them covered, I'm going to talk about some modifications for the first two Scubas. As they came out of the factory their breathing quality is merely adequate: this is because as mentioned earlier, the valve body wasn't positioned optimally; it was 90-degrees off! These two regulators have been "keyed" so that the valve body can only fit into the lower can one way: 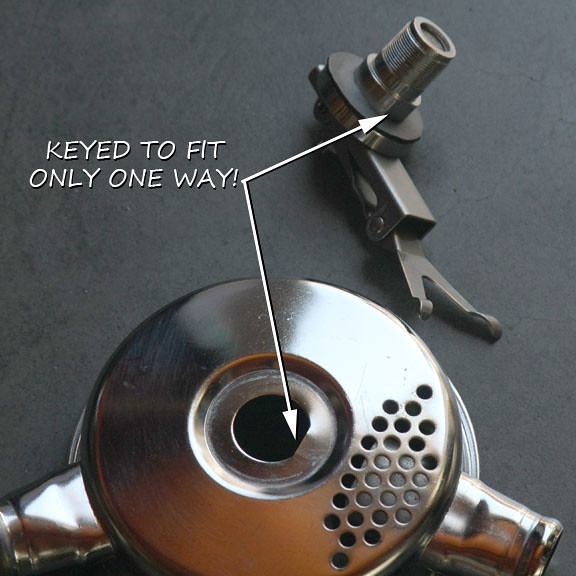 The problem with this arrangement is that the regulator can is flooded with air that eventually works its way through the hose and to the diver's lungs. By simply using a file or grinding device to remove the flat spot (keying) in the can, you are now able to to turn the valve body to deliver the air better: this should be done by anyone who actually plans to use this regulator to dive with. The next problem is that 50% of our air is now being channeled away from the air horn due to the shape of the valve body's opening! This can be fixed by cutting a metal disc the size of the valve body, and drilling three holes that match those of the on the lever assembly: two screws and the actuator. Next, attach the disc and and levers to the valve body: finally pry up the side of the disc that is facing the air horn: 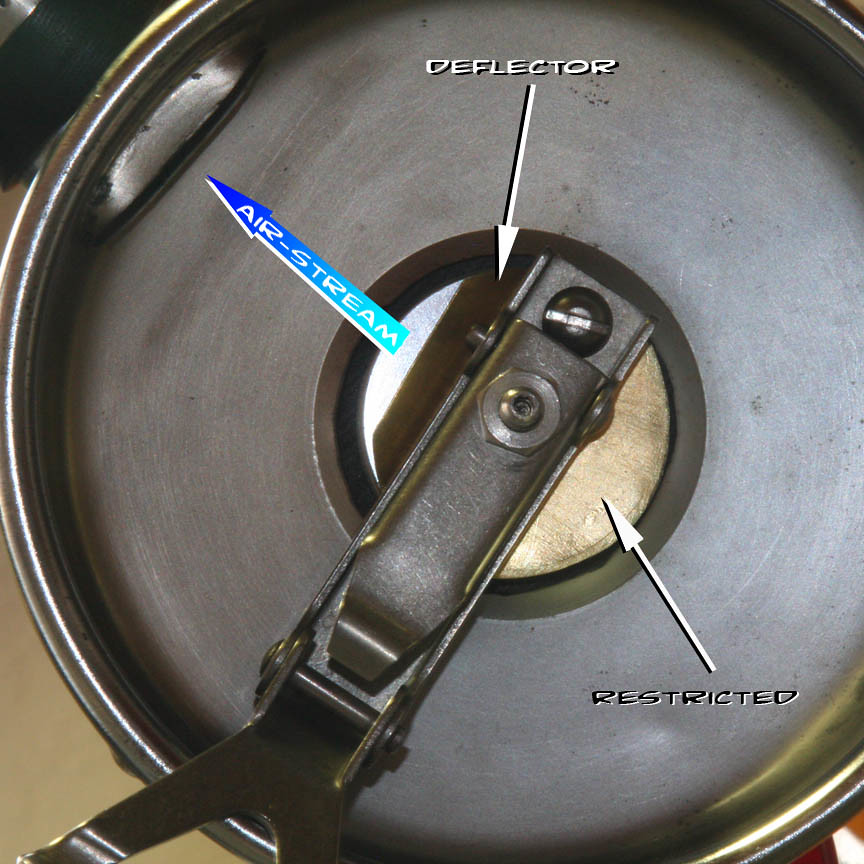 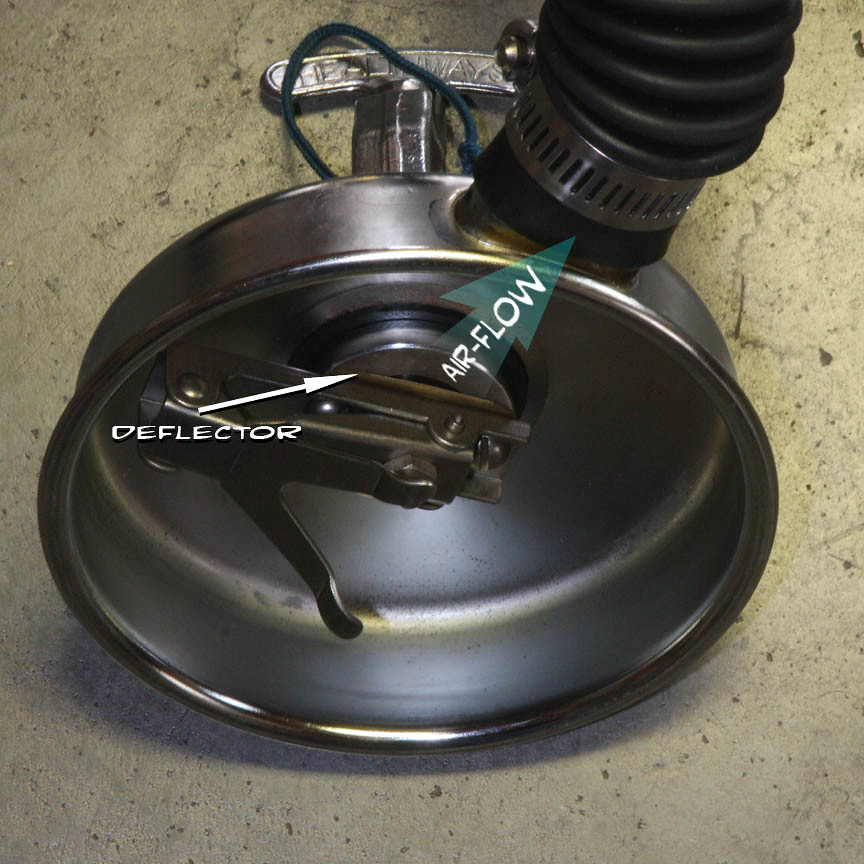 A much more sophisticated version can be made too: 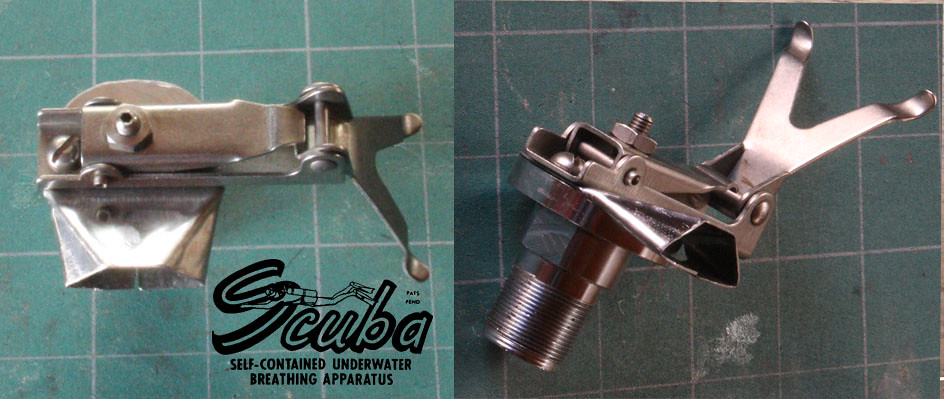 I would recommend making the snorkel longer so that it actually touches the air horn! On some of the early Scuba Deluxe models they had not figured out that at times the main diaphragm can press against the exhaust mushroom and seal it shut. Later Deluxe models had a diaphragm stop put in, which was just a simple tab soldered in, but my version was designed so that the diaphragm will rest straight: 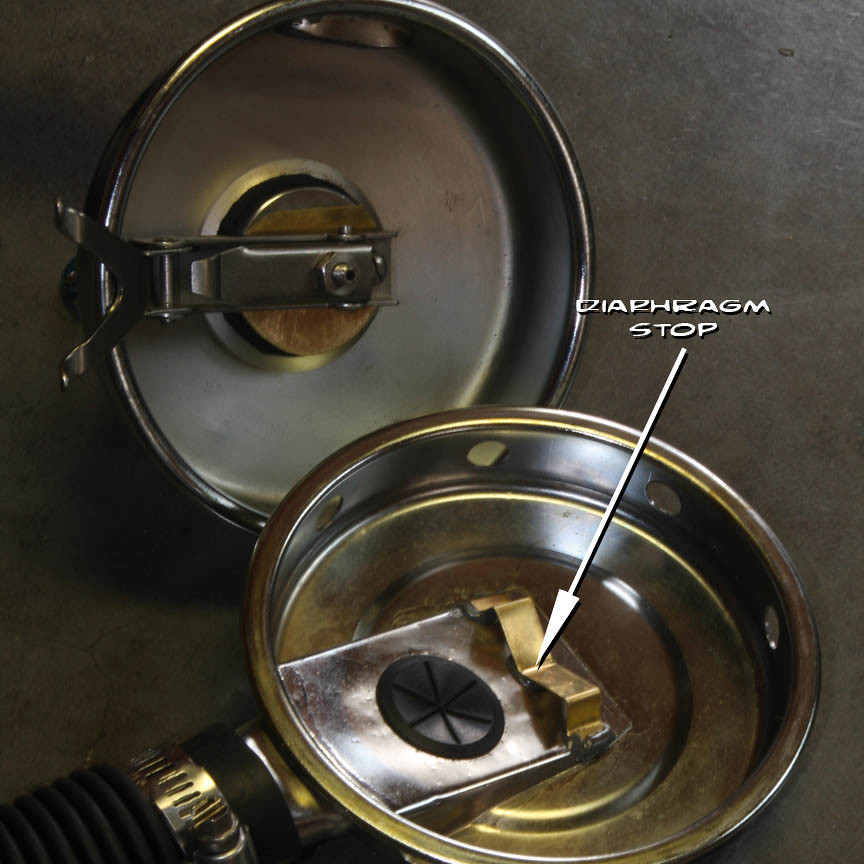 Gosh, all this has given me dyslexia-brain-fry: too much thinking all at once! JB |
|
|
|
Post by duckbill on Aug 15, 2016 10:38:04 GMT -8
I have at least one valve with the nylon, but can't recall what brand. I'll try to remember to check and report back after I get back home. O.K. I checked, and the valve I have with the nylon disc seal is a Dacor "Superior" 5871 on a 1955 Dacor steel 70 with no subsequent hydro test stamps. I assume the valve is original to the cylinder, and may have never been removed since originally installed. |
|
|
|
Post by nikeajax on Sept 7, 2016 13:07:58 GMT -8
I'd like to discuss the Japanese film "The Hidden Blade":  Oh-geez-wait! That's the hidden o-ring  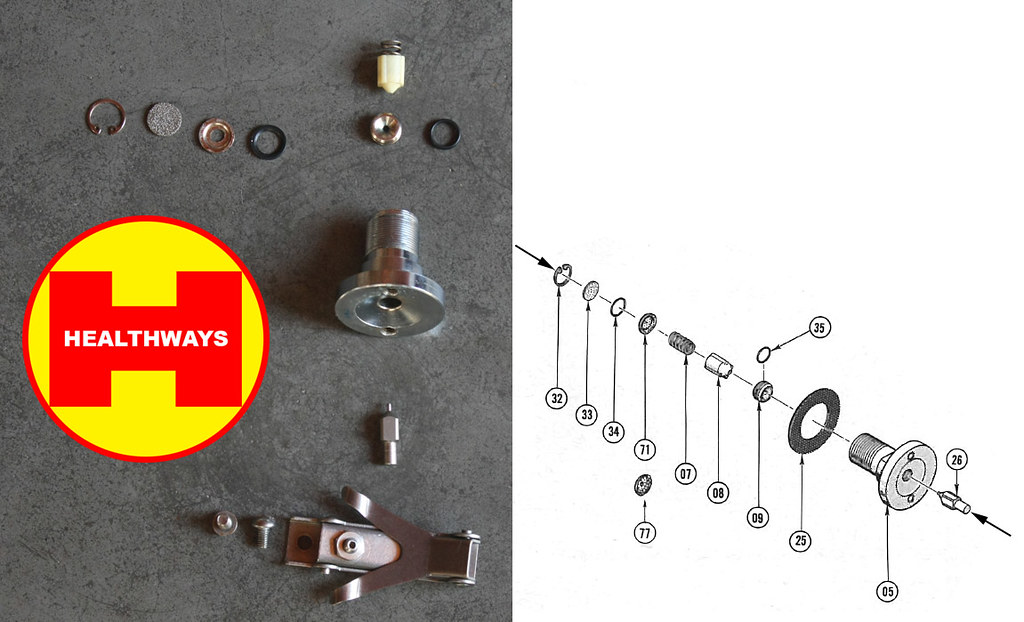 Sorry, I've had had so much going on lately I neglected to point out that all of DH regulators made by Healthways have an o-ring that seals the high pressure seat. It is reversible, so unless you've really buggered yours up it shouldn't matter which way you put it in. In the photo the valve seat is in the upper right hand corner, right under the nylon valve plunger, it's very shiny, in the diagram the valve seat is part No. 9, and the o-ring is part No. 35. To remove the valve seat, use the actuator, part No. 26 to push it through, then use something VERY soft like a chopstick to push it the rest of the way through the valve body. WARNING:Never under any circumstances use any sort of metal tool to push the valve seat out--EVER! You will damage the seat and the soft nylon valve plunger may be damaged beyond repair! JB PS If you like Samurai films, see "The Hidden Blade", it's a-typical of the genera and quite thoughtful, not just hack and slash  |
|
|
|
Post by tomcatpc on Sept 7, 2016 19:26:40 GMT -8
I think my Valve Seat (09) is completely gone? I think that is why I don't have that "phantom O-Ring"? It is long gone...
Looking inside the valve body (05) "big chingadera everything goes into", the part where the High Pressure Seat (08) meets the top inside surface looks to be shaped to fit the HP seat...not sure that made sense, and not sure why I needed to write it?
My HP Seat is more of a translucent/clear plastic instead of the solid white coloured plastic I see on most Healthways HP Seats.
I'm guessing finding a HW SCUBA Valve Seat loose is going to be a treasure hunt? This might get put on the back burner for the time being?
Mark
|
|
|
|
Post by SeaRat on Sept 7, 2016 19:52:26 GMT -8
Mark, you can take a pencil and push the valve seat out to see its condition. I assume that the O-ring is there, but is so old that it is hardened that the seat will be difficult to get out, but it will come out.
John
|
|
|
|
Post by Seahuntjerry on Sept 7, 2016 21:09:14 GMT -8
Mark To push out valve seat try a cut off q tip.
I do have new valve seats and nylon white plungers Sportsways aka Healthways ,suggest you buy one form Rob Scuba Museum contact him directly
|
|
|
|
Post by tomcatpc on Sept 7, 2016 21:16:10 GMT -8
Check this out...the valve seat was not missing at all...it was jammed in there and looked like the valve body was machined like that...
It was there all along, feel like a dufus!
The O-Ring was there as well...still in decent shape, but going to change it.
The "Phantom O-Ring" was on the groove on the Valve seat.
The second O-Ring, by the filter and restrictor plate...does the O-Ring go on the groove of the restrictor plate?, or between the Rest. plate and the filter? It was in between when I first took it apart.
Mark
|
|
|
|
Post by SeaRat on Sept 7, 2016 22:19:52 GMT -8
Check this out...the valve seat was not missing at all...it was jammed in there and looked like the valve body was machined like that... It was there all along, feel like a dufus! The O-Ring was there as well...still in decent shape, but going to change it. The "Phantom O-Ring" was on the groove on the Valve seat. The second O-Ring, by the filter and restrictor plate...does the O-Ring go on the groove of the restrictor plate?, or between the Rest. plate and the filter? It was in between when I first took it apart. Mark Don't feel like a dufus; it took me several years to know that the seat could come out. On your second question, the O-ring goes on the restrictor plate's groove, but between the restrictor plate and the sintered filter, so that it will seal. John |
|
|
|
Post by nikeajax on Sept 8, 2016 6:39:01 GMT -8
Mark, the o-ring goes between the filter and plate so that it is convex toward the filter (the sticky-outty part): you may want to enlarge that hole in the plate! Your Scuba Star had this feature too but I got rid of it; I certainly don't want to be that vintage while diving...
JB
|
|
|
|
Post by tomcatpc on Sept 8, 2016 13:30:21 GMT -8
If I use it with the restrictor plate and a J-Valve, what will happen? Will the air get restricted at 600-ish PSI?
I'd rather not do a permanent modification and don't think I'll dive this one a lot, well at least just yet...
I'd rather find another restrictor plate that is for a J-Valve, but not going to get my hopes up...plus I need to get other things first.
I'll proceed with building as it goes.
Mark
I'm going to add other questions concerning rebuilding the reg. to the "More Healthways Questions" topic. I don't like "clogging up" this informational topic on the timeline of HW Double Hose Regs. with questions on my rebuild. If that makes sense?
|
|